在本快速入门中,你将创建一个桌面Windows应用程序,该应用程序使用 Windows 应用 SDK 发送和接收推送通知。
Prerequisites
- 开始开发Windows应用
- 创建使用 Windows 应用 SDK 的新项目 或 在现有项目中使用 Windows 应用 SDK
- 若要使用Windows 应用 SDK推送通知,需要使用 Azure Account。
- 阅读 推送通知概述
打包要求
Windows 应用 SDK中的推送通知支持打包的桌面应用和真正解压缩的桌面应用。 但是, 后台传送和 COM 激活需要包标识 , 这是最常见的生产方案。 下表总结了根据你的打包模型所需的要求:
| 打包模型 | 需要 COM 激活器 | 所需的 PFN 映射 | 支持解压缩 |
|---|---|---|---|
| MSIX 打包 (WinUI 3,打包WPF/WinForms) | 是 — 在 Package.appxmanifest |
是 — 通过 PFN 映射电子邮件 | 否 |
| 打包为外部位置 | 是 — 在 Package.appxmanifest |
是 — 通过 PFN 映射电子邮件 | 否 |
| 真正解压缩 (无包标识) | 否(跳过步骤 3) | 否 | 是 — 有限的功能 |
Important
如果应用已打包(MSIX 或以外部位置进行打包),则必须在推送通知生效之前将应用的 Package Family Name (PFN) 映射到其 Azure AppId。 映射请求通过电子邮件提交, Win_App_SDK_Push@microsoft.com 每周处理 一次。 在启动之前规划此准备时间。
有关详细信息,请参阅 Step 4:将应用的程序包系列名称映射到其Azure AppId。
示例应用
本快速入门介绍如何在 Windows 应用 SDK 1.7 上向应用添加推送通知支持。 请在 GitHub 上的示例应用中查看与此快速入门类似的代码。 确保查看包含您首选版本 Windows 应用 SDK 的分支,以获取最适合项目的示例。
还可以通过在示例存储库中选择版本分支来查找每个版本的Windows 应用 SDK示例。
API 参考
有关推送通知的 API 参考文档,请参阅 Microsoft.Windows。PushNotifications Namespace。
在 Azure Active Directory (AAD) 中配置应用的标识
Windows 应用 SDK中的推送通知使用来自Azure Active Directory(AAD)的标识。 请求 WNS 通道 URI 和请求访问令牌以发送推送通知时,需要Azure凭据。 注意:我们不支持将Windows 应用 SDK推送通知与Microsoft 合作伙伴中心配合使用。
步骤 1:创建 AAD 应用注册
登录到Azure帐户并创建新的 AAD 应用注册资源。 选择“新注册”。
步骤 2:提供名称并选择多租户选项
提供应用名称。
推送通知需要多租户选项,因此请选择该选项。
- 有关租户的详细信息,请参阅谁可以登录到你的应用?
选择注册
记下 应用程序(客户端)ID,因为这是你在激活注册和访问令牌请求期间使用的 Azure App ID。
记下你的 目录(租户) ID,因为这是你在请求访问令牌时将使用的 Azure 租户 ID。
Important
 记下您的 应用程序(客户端)ID 和 目录(租户)ID。
记下 Object ID,因为这是请求通道请求时将使用的 Azure ObjectId。 请注意,这不是 “概要” 页上列出的对象 ID。 相反,若要查找正确的对象 ID,请在 Essentials 页的本地目录字段中单击托管应用程序中的应用名称:


Note
服务主体用于获取对象 ID。如果您的应用没有关联的对象 ID,请按照以下文章中的步骤,在 Azure 门户中或使用命令行创建一个:
步骤 3:为应用注册创建机密
在请求访问令牌以发送推送通知时,您的机密将与 Azure 的 AppId/ClientId 一起使用。

导航到 证书和机密 ,然后选择 “新建客户端密码”。
Important
确保创建机密后复制机密并将其存储在安全位置,例如Azure 密钥保管库。 创建后,该内容只能查看一次。
步骤 4:将应用的程序包系列名称映射到其Azure AppId
如果您的应用程序已打包(包括在外部位置打包),您可以使用此流程来映射应用程序的包系列名称(PFN)及其 Azure AppId。
如果你的应用是打包的 Win32 应用,请通过发送电子邮件到 Win_App_SDK_Push@microsoft.com,主题行填写为“Windows 应用 SDK推送通知映射请求”,邮件正文为“PFN:[你的 PFN]”,AppId:[你的AppId],ObjectId:[你的ObjectId]”来创建程序包系列名称(PFN)映射请求。 映射请求每周都会完成。 映射请求完成后,将收到通知。
一旦您获得了 Azure AppId、ObjectId 和密钥,您就可以将这些凭据添加到下面的示例代码中。
将应用配置为接收推送通知
步骤 1:添加Windows 应用 SDK和所需的 NuGet 包
接下来,右键单击解决方案资源管理器中的解决方案,然后选择 Manage NuGet 包。
在程序包管理器中,添加以下包:
- Microsoft。WindowsAppSDK (最低版本 1.1.0)
- Microsoft。Windows。Sdk。BuildTools (最低版本 10.0.22000.194)
- Microsoft。Windows。CppWinRT,(最低版本 2.0.210930.14)
- Microsoft。Windows。ImplementationLibrary(最低版本 1.0.210930.1)
如果这是你第一次在项目中使用Windows 应用 SDK,并且它打包为外部位置或未打包,请通过将以下属性添加到项目文件来初始化Windows 应用 SDK:
<!-- your .vcxproj or .proj file -->
<PropertyGroup Label="Globals">
    <!-- Other properties -->
    <WindowsPackageType>None</WindowsPackageType>
</PropertyGroup>
或使用引导程序 API。 有关更多详细信息,请参阅 关于使用Windows应用程序SDK运行时的应用程序,这些应用程序可能是打包到外部位置或未打包的。
Note
如果未初始化 SDK,应用将引发 System.Runtime.InteropServices.COMException (0x80040154): Class not registered (0x80040154 (REGDB_E_CLASSNOTREG)) 且不会运行。
步骤 2:添加命名空间
接下来,添加Windows 应用 SDK推送通知Microsoft.Windows.PushNotifications的命名空间。
#include <winrt/Microsoft.Windows.PushNotifications.h>

using namespace winrt::Microsoft::Windows::PushNotifications;
如果收到“找不到 Microsoft.Windows。PushNotifications“错误,这很可能意味着尚未生成头文件。 若要解决此问题,请确保已安装上述包,注释掉包含和使用导致错误的语句,并重新生成应用程序以生成头文件。 生成成功后,取消注释 include 和 using 语句,并重新生成项目。 这应该可以解决此错误。
步骤 3:将 COM 激活器添加到应用的清单
Important
如果应用已解压缩(即运行时缺少包标识),请跳到 步骤 4:注册并响应应用启动时的推送通知。
如果你的应用程序已打包(包括与外部位置一起打包),请打开 Package.appxmanifest。 在元素中添加 <Application> 以下内容。 将Id和ExecutableDisplayName值替换为特定于你的应用的值。
<!--Packaged apps only-->
<!--package.appxmanifest-->

<Package
  ...
  xmlns:com="http://schemas.microsoft.com/appx/manifest/com/windows10"
  ...
  <Applications>
    <Application>
      ...
      <Extensions>

        <!--Register COM activator-->
        <com:Extension Category="windows.comServer">
          <com:ComServer>
              <com:ExeServer Executable="SampleApp\SampleApp.exe" DisplayName="SampleApp" Arguments="----WindowsAppRuntimePushServer:">
                <com:Class Id="[Your app's Azure AppId]" DisplayName="Windows App SDK Push" />
            </com:ExeServer>
          </com:ComServer>
        </com:Extension>

      </Extensions>
    </Application>
  </Applications>
 </Package>
Note
Id 中的 <com:Class> 属性必须设置为Azure AppId(Azure AD 应用注册中的应用程序(客户端)ID)。 这就是 Windows 应用 SDK 如何将应用的 COM 激活链接到其 Azure 标识 —— 当 WNS 激活应用以传送后台推送通知时,使用此 GUID 查找并启动正确的 COM 服务器。 使用上述步骤 1 中记录的相同 Azure AppId 值。
Note
本示例已完成的C++类示例可在 步骤 5 之后找到。 步骤 4 和 5 提供了分步指南,用于在最后一个示例中添加每个部分。
步骤 4:在应用启动时注册和响应推送通知
更新应用 main() 的方法以添加以下内容:
- 通过调用 PushNotificationManager::Default().Register()注册应用以接收推送通知。
- 通过调用 AppInstance::GetCurrent().GetActivatedEventArgs()来检查激活请求的源。 如果激活是由推送通知触发的,请根据通知的消息内容进行响应。
Important
必须在调用 AppInstance.GetCurrent.GetActivatedEventArgs之前,调用 PushNotificationManager::Default().Register。
添加前台事件处理程序
若要在前台处理事件,请为 PushNotificationManager.PushReceived 注册处理程序。
Important
在调用 PushNotificationManager.Register()之前,还必须注册任何 PushNotificationManager.PushReceived 事件处理程序。 否则,将引发以下运行时异常:
System.Runtime.InteropServices.COMException: Element not found. Must register event handlers before calling Register().
添加 PushNotificationManager::IsSupported() 检查
接下来,添加一个检查,以查看是否通过PushNotificationManager.IsSupported()支持 PushNotification API。 否则,我们建议您使用轮询或您自己的自定义套接字实现。
现在,已确认推送通知支持,请据此在 PushNotificationReceivedEventArgs 中添加对应的行为。
步骤 5:请求 WNS 通道 URI 并将其注册到 WNS 服务器
WNS 通道 URI 是用于发送推送通知的 HTTP 终结点。 每个客户端必须请求通道 URI 并将其注册到 WNS 服务器以接收推送通知。
Note
WNS 通道 URI 在 30 天后过期。 在每个应用启动时请求新的通道 URI ,而不是缓存以前的通道 URI。 当新 URI 与后端存储的内容不同时,将更新的 URI 发送到云服务,以便它可以保持其记录最新状态。 不要假设 URI 在会话之间保持稳定 - 将其视为可变的会话范围值,可避免由于过期或过时的通道 URI 而导致的无提示传递失败。
auto channelOperation{ PushNotificationManager::Default().CreateChannelAsync(winrt::guid("[Your app's Azure ObjectID]")) };
如果您正在按照教程代码操作,请在此处添加您的Azure对象 ID:
// To obtain an AAD RemoteIdentifier for your app,
// follow the instructions on https://dotnet.territoriali.olinfo.it/azure/active-directory/develop/quickstart-register-app
winrt::guid remoteId{ "00000000-0000-0000-0000-000000000000" }; // Replace this with your own Azure ObjectId
PushNotificationManager 将尝试创建一个通道URI,并且在15分钟内自动重试。 创建事件处理程序以等待调用完成。 调用完成后,如果成功,请向 WNS 服务器注册 URI。
示例代码
#include <iostream>
#include <winrt/Microsoft.Windows.PushNotifications.h>
#include <winrt/Windows.Foundation.h>
#include <winrt/Microsoft.Windows.AppLifecycle.h>
#include <winrt/Windows.ApplicationModel.Background.h>
#include <wil/cppwinrt.h>
#include <wil/result.h>

using namespace winrt::Microsoft::Windows::PushNotifications;
using namespace winrt::Windows::Foundation;
using namespace winrt::Microsoft::Windows::AppLifecycle;

// To obtain an AAD RemoteIdentifier for your app,
// follow the instructions on https://dotnet.territoriali.olinfo.it/azure/active-directory/develop/quickstart-register-app
winrt::guid remoteId{ "00000000-0000-0000-0000-000000000000" }; // Replace this with your own Azure ObjectId

winrt::Windows::Foundation::IAsyncOperation<PushNotificationChannel> RequestChannelAsync()
{
    auto channelOperation = PushNotificationManager::Default().CreateChannelAsync(remoteId);

    // Set up the in-progress event handler
    channelOperation.Progress(
        [](auto&& sender, auto&& args)
        {
            if (args.status == PushNotificationChannelStatus::InProgress)
            {
                // This is basically a noop since it isn't really an error state
                std::cout << "Channel request is in progress." << std::endl << std::endl;
            }
            else if (args.status == PushNotificationChannelStatus::InProgressRetry)
            {
                LOG_HR_MSG(
                    args.extendedError,
                    "The channel request is in back-off retry mode because of a retryable error! Expect delays in acquiring it. RetryCount = %d",
                    args.retryCount);
            }
        });

    auto result = co_await channelOperation;

    if (result.Status() == PushNotificationChannelStatus::CompletedSuccess)
    {
        auto channelUri = result.Channel().Uri();

        std::cout << "channelUri: " << winrt::to_string(channelUri.ToString()) << std::endl << std::endl;

        auto channelExpiry = result.Channel().ExpirationTime();

        // Caller's responsibility to keep the channel alive
        co_return result.Channel();
    }
    else if (result.Status() == PushNotificationChannelStatus::CompletedFailure)
    {
        LOG_HR_MSG(result.ExtendedError(), "We hit a critical non-retryable error with channel request!");
        co_return nullptr;
    }
    else
    {
        LOG_HR_MSG(result.ExtendedError(), "Some other failure occurred.");
        co_return nullptr;
    }

};

PushNotificationChannel RequestChannel()
{
    auto task = RequestChannelAsync();
    if (task.wait_for(std::chrono::seconds(300)) != AsyncStatus::Completed)
    {
        task.Cancel();
        return nullptr;
    }

    auto result = task.GetResults();
    return result;
}

void SubscribeForegroundEventHandler()
{
    winrt::event_token token{ PushNotificationManager::Default().PushReceived([](auto const&, PushNotificationReceivedEventArgs const& args)
    {
        auto payload{ args.Payload() };

        std::string payloadString(payload.begin(), payload.end());
        std::cout << "\nPush notification content received in the FOREGROUND: " << payloadString << std::endl;
    }) };

    std::cout << "Push notification foreground event handler registered." << std::endl;
}

int main()
{
    // Set up an event handler, so we can receive notifications in the foreground while the app is running.
    // You must register notification event handlers before calling Register(). Otherwise, the following runtime
    // exception will be thrown: System.Runtime.InteropServices.COMException: 'Element not found. Must register
    // event handlers before calling Register().'
    SubscribeForegroundEventHandler();

    // Register the app for push notifications.
    PushNotificationManager::Default().Register();

    auto args{ AppInstance::GetCurrent().GetActivatedEventArgs() };
    switch (args.Kind())
    {
        case ExtendedActivationKind::Launch:
        {
            std::cout << "App launched by user or from the debugger." << std::endl;
            if (PushNotificationManager::IsSupported())
            {
                std::cout << "Push notifications are supported on this device." << std::endl;

                // Request a WNS Channel URI which can be passed off to an external app to send notifications to.
                // The WNS Channel URI uniquely identifies this app for this user and device.
                PushNotificationChannel channel{ RequestChannel() };
                if (!channel)
                {
                    std::cout << "\nThere was an error obtaining the WNS Channel URI" << std::endl;

                    if (remoteId == winrt::guid{ "00000000-0000-0000-0000-000000000000" })
                    {
                        std::cout << "\nThe ObjectID has not been set. Refer to the readme file accompanying this sample\nfor the instructions on how to obtain and setup an ObjectID" << std::endl;
                    }
                }

                std::cout << "\nPress 'Enter' at any time to exit App." << std::endl;
                std::cin.ignore();
            }
            else
            {
                std::cout << "Push notifications are NOT supported on this device." << std::endl;
                std::cout << "App implements its own custom socket here to receive messages from the cloud since Push APIs are unsupported." << std::endl;
                std::cin.ignore();
            }
        }
        break;

        case ExtendedActivationKind::Push:
        {
            std::cout << "App activated via push notification." << std::endl;
            PushNotificationReceivedEventArgs pushArgs{ args.Data().as<PushNotificationReceivedEventArgs>() };

            // Call GetDeferral to ensure that code runs in low power
            auto deferral{ pushArgs.GetDeferral() };

            auto payload{ pushArgs.Payload() };

            // Do stuff to process the raw notification payload
            std::string payloadString(payload.begin(), payload.end());
            std::cout << "\nPush notification content received in the BACKGROUND: " << payloadString.c_str() << std::endl;
            std::cout << "\nPress 'Enter' to exit the App." << std::endl;

            // Call Complete on the deferral when finished processing the payload.
            // This removes the override that kept the app running even when the system was in a low power mode.

            deferral.Complete();
            std::cin.ignore();
        }
        break;

        default:
            std::cout << "\nUnexpected activation type" << std::endl;
            std::cout << "\nPress 'Enter' to exit the App." << std::endl;
            std::cin.ignore();
            break;
    }
}
步骤 6:生成并安装应用
使用Visual Studio生成和安装应用。 右键单击解决方案资源管理器中的解决方案文件,然后选择 Deploy。 Visual Studio将生成应用并将其安装在计算机上。 可以通过“开始”菜单或Visual Studio调试器启动应用来运行该应用。
教程代码的控制台如下所示:
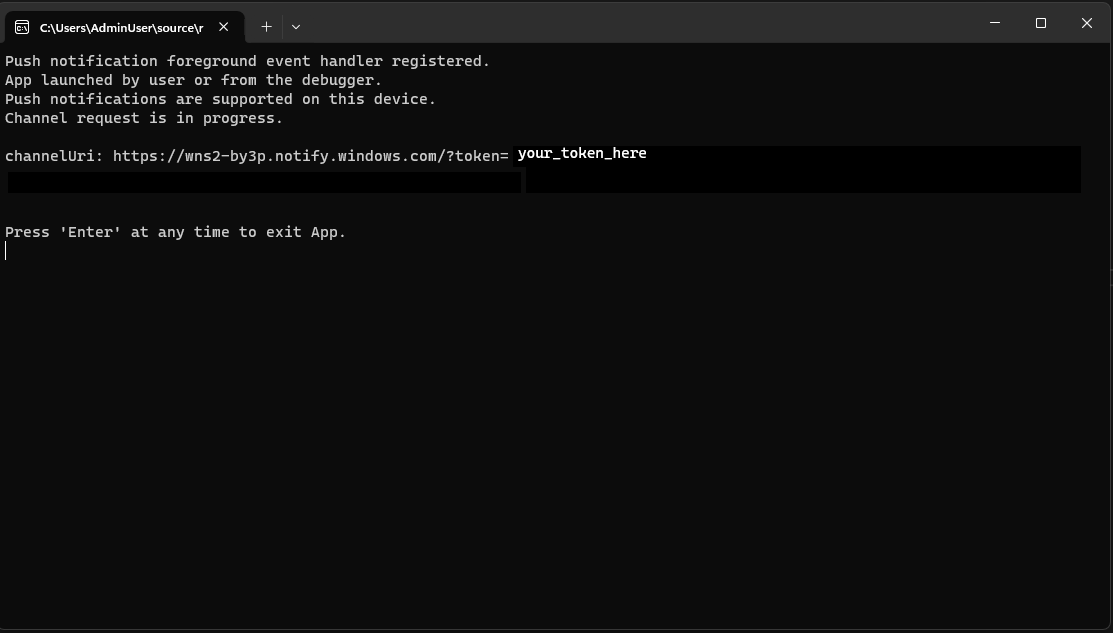
需要令牌才能向 应用发送推送通知。
向应用发送推送通知
此时,所有配置都已完成,WNS 服务器可以将推送通知发送到客户端应用。 在以下步骤中,请参阅 推送通知服务器请求和响应标头 以获取更多详细信息。
步骤 1:请求访问令牌
若要发送推送通知,WNS 服务器首先需要请求访问令牌。 使用 Azure TenantId、Azure AppId 和机密发送 HTTP POST 请求。 有关检索 Azure TenantId 和 Azure AppId 的信息,请参阅获取登录的租户和应用 ID 值。
HTTP 示例请求:
POST /{tenantID}/oauth2/v2.0/token Http/1.1
Host: login.microsoftonline.com
Content-Type: application/x-www-form-urlencoded
Content-Length: 160

grant_type=client_credentials&client_id=<Azure_App_Registration_AppId_Here>&client_secret=<Azure_App_Registration_Secret_Here>&scope=https://wns.windows.com/.default/
C# 示例请求:
//Sample C# Access token request
var client = new RestClient("https://login.microsoftonline.com/{tenantID}/oauth2/v2.0");
var request = new RestRequest("/token", Method.Post);
request.AddHeader("Content-Type", "application/x-www-form-urlencoded");
request.AddParameter("grant_type", "client_credentials");
request.AddParameter("client_id", "[Your app's Azure AppId]");
request.AddParameter("client_secret", "[Your app's secret]");
request.AddParameter("scope", "https://wns.windows.com/.default");
RestResponse response = await client.ExecutePostAsync(request);
Console.WriteLine(response.Content);
如果请求成功,将收到一个响应,其中包含 access_token 字段中的令牌。
{
    "token_type":"Bearer",
    "expires_in":"86399",
    "ext_expires_in":"86399",
    "expires_on":"1653771789",
    "not_before":"1653685089",
    "access_token":"[your access token]"
}
步骤 2. 发送原始通知
创建一个 HTTP POST 请求,其中包含在上一步中获取的访问令牌和要发送的推送通知的内容。 推送通知的内容将传送到应用。
POST /?token=[The token query string parameter from your channel URL. E.g. AwYAAABa5cJ3...] HTTP/1.1
Host: dm3p.notify.windows.com
Content-Type: application/octet-stream
X-WNS-Type: wns/raw
Authorization: Bearer [your access token]
Content-Length: 46

{ Sync: "Hello from the Contoso App Service" }
var client = new RestClient("[Your channel URL. E.g. https://wns2-by3p.notify.windows.com/?token=AwYAAABa5cJ3...]");
var request = new RestRequest();
request.Method = Method.Post;
request.AddHeader("Content-Type", "application/octet-stream");
request.AddHeader("X-WNS-Type", "wns/raw");
request.AddHeader("Authorization", "Bearer [your access token]");
request.AddBody("Notification body");
RestResponse response = await client.ExecutePostAsync(request);");
步骤 3:发送云源应用通知
如果只想发送原始通知,请忽略此步骤。 若要发送基于云的应用通知(也称为推送通知),请先遵循 快速入门:Windows 应用 SDK 中的应用通知。 应用通知可以推送(从云发送)或在本地发送。 发送基于云的应用通知类似于在 步骤 2中发送原始通知,但与此不同的是,X-WNS-Type 标头需要 toast,Content-Type 需要 text/xml,并且内容包含应用通知 XML 有效负载。 有关如何构造 XML 有效负载的详细信息,请参阅 通知 XML 架构 。
创建一个 HTTP POST 请求,其中包含访问令牌和要发送的云源应用通知的内容。 推送通知的内容将传送到应用。
POST /?token=AwYAAAB%2fQAhYEiAESPobjHzQcwGCTjHu%2f%2fP3CCNDcyfyvgbK5xD3kztniW%2bjba1b3aSSun58SA326GMxuzZooJYwtpgzL9AusPDES2alyQ8CHvW94cO5VuxxLDVzrSzdO1ZVgm%2bNSB9BAzOASvHqkMHQhsDy HTTP/1.1
Host: dm3p.notify.windows.com
Content-Type: text/xml
X-WNS-Type: wns/toast
Authorization: Bearer [your access token]
Content-Length: 180

<toast><visual><binding template="ToastGeneric"><text>Example cloud toast notification</text><text>This is an example cloud notification using XML</text></binding></visual></toast>
var client = new RestClient("https://dm3p.notify.windows.com/?token=AwYAAAB%2fQAhYEiAESPobjHzQcwGCTjHu%2f%2fP3CCNDcyfyvgbK5xD3kztniW%2bjba1b3aSSun58SA326GMxuzZooJYwtpgzL9AusPDES2alyQ8CHvW94cO5VuxxLDVzrSzdO1ZVgm%2bNSB9BAzOASvHqkMHQhsDy");
client.Timeout = -1;

var request = new RestRequest(Method.POST);
request.AddHeader("Content-Type", "text/xml");
request.AddHeader("X-WNS-Type", "wns/toast");
request.AddHeader("Authorization", "Bearer <AccessToken>");
request.AddParameter("text/xml", "<toast><visual><binding template=\"ToastGeneric\"><text>Example cloud toast notification</text><text>This is an example cloud notification using XML</text></binding></visual></toast>",  ParameterType.RequestBody);
Console.WriteLine(response.Content);
