이 빠른 시작에서는 Windows 앱 SDK 사용하여 푸시 알림을 보내고 받는 데스크톱 Windows 애플리케이션을 만듭니다.
Prerequisites
- Windows 앱 개발 시작
- Windows 앱 SDK 또는 기존 프로젝트에서 Windows 앱 SDK 사용하는 새 프로젝트 만들기
- Windows 앱 SDK 푸시 알림을 사용하려면 Azure 계정 필요합니다.
- 푸시 알림 개요를 읽기
패키징 요구 사항
Windows 앱 SDK 푸시 알림은 패키지된 데스크톱 앱과 패키지되지 않은 데스크톱 앱을 모두 지원합니다. 그러나 가장 일반적인 프로덕션 시나리오인 백그라운드 배달 및 COM 활성화에는 패키지 ID가 필요합니다 . 다음 표에서는 패키징 모델에 따라 필요한 사항을 요약합니다.
| 패키징 모델 | COM 활성화 프로그램 필요 | PFN 매핑 필요 | 패키지되지 않은 지원됨 |
|---|---|---|---|
| MSIX packaged(WinUI 3, 패키지된 WPF/WinForms) | 예, Package.appxmanifest에서 |
예 - PFN 매핑 전자 메일을 통해 | No |
| 외부 위치가 포함되어 제공됨 | 예, Package.appxmanifest에서 |
예 - PFN 매핑 전자 메일을 통해 | No |
| 실제로 패키지되지 않음 (패키지 ID 없음) | 아니요(3단계 건너뛰기) | No | 예 - 제한된 기능 |
Important
앱이 패키지(MSIX 또는 외부 위치로 패키지된 경우)라면, 푸시 알림이 작동하도록 하기 전에 앱의 패키지 제품군 이름(PFN)을 Azure AppId에 매핑해야 합니다. 매핑 요청은 이메일로 Win_App_SDK_Push@microsoft.com 제출되며 매주 처리됩니다. 시작하기 전에 이 리드 타임을 계획합니다.
자세한 내용은 단계 4: 앱의 패키지 패밀리 이름을 Azure AppId에 매핑을 참조하세요.
샘플 앱
이 빠른 시작에서는 Windows 앱 SDK 1.7에서 앱에 푸시 알림 지원을 추가하는 방법을 안내합니다. GitHub 있는 샘플 앱에서 이 빠른 시작과 유사한 코드를 참조하세요. Windows 앱 SDK의 원하는 버전으로 브랜치를 선택하여 프로젝트에 가장 적합한 샘플을 확인하세요.
샘플 리포지토리 버전 분기를
API 참고 자료
API 참조 설명서를 보려면 Microsoft.Windows.PushNotifications 네임스페이스 아래의 푸시 알림 섹션을 참고하세요.
AAD(Azure Active Directory)에서 앱 ID 구성
Windows 앱 SDK 푸시 알림은 AAD(Azure Active Directory)의 ID를 사용합니다. Azure 자격 증명은 WNS 채널 URI를 요청하고 푸시 알림을 보내기 위해 액세스 토큰을 요청할 때 필요합니다. Note: Microsoft Partner Center Windows 앱 SDK 푸시 알림을 사용하여 NOT 지원을 수행합니다.
1단계: AAD 앱 등록 만들기
Azure 계정에 로그인하고 새 AAD 앱 등록 리소스를 만듭니다. 새 등록선택합니다.
2단계: 이름 입력 및 다중 테넌트 옵션 선택
앱 이름을 입력합니다.
푸시 알림에는 다중 테넌트 옵션이 필요하므로 선택합니다.
- 테넌트에 대한 자세한 내용은 앱에 누가 로그인할 수 있는지에 대한 정보를 참조하십시오..
등록을 선택합니다.
활성화 등록 및 액세스 토큰 요청 중에 사용할 Application(클라이언트) IDAzure AppId 기록해 둡니다.
"
디렉터리(테넌트) ID "는 액세스 토큰을 요청할 때 사용할Azure TenantId 이므로 기록해 둡니다.Important
 해당 애플리케이션(클라이언트) ID 및 디렉터리(테넌트) ID를 기록해 두십시오.
채널 요청을 요청할 때 사용할 Object IDAzure ObjectId 기록해 둡니다. 중요한 점은 이것이 Essentials 페이지에 나열된 개체 ID가 아니라는 것입니다. 대신 올바른
개체 ID 를 찾으려면,Essentials 페이지의 로컬 디렉터리 필드에 있는관리 애플리케이션에서 앱 이름을 클릭하십시오. 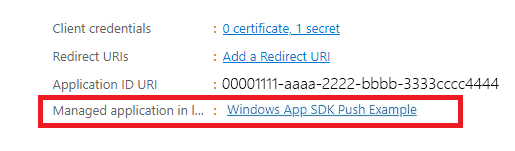
개체 ID 필드 보여 주는
스크린샷 Note
개체 ID를 가져오려면 서비스 주체가 필요합니다. 앱과 연결된 항목이 없는 경우 다음 문서 중 하나의 단계에 따라 Azure 포털에서 만들거나 명령줄을 사용합니다.
3단계: 앱 등록에 대한 비밀 만들기
푸시 알림을 보내기 위해 액세스 토큰을 요청할 때 Azure AppId/ClientId와 함께 비밀이 사용됩니다.

인증서 및 비밀로 이동하고 새 클라이언트 암호를 선택합니다.
Important
비밀을 만든 후 복사하고 Azure Key Vault 같은 안전한 위치에 저장해야 합니다. 만든 직후에 한 번만 볼 수 있습니다.
4단계: 앱의 패키지 패밀리 이름을 Azure AppId에 매핑
앱이 패키지된 경우(외부 위치에 패키징 포함) 이 프로세스를 사용하여 앱의 패키지 패밀리 이름(PFN)과 Azure AppId를 매핑할 수 있습니다.
앱이 패키지된 Win32 앱인 경우 제목 줄 "Windows 앱 SDK 푸시 알림 매핑 요청" 및 본문 "PFN: [PFN]", AppId: [YOUR APPId], ObjectId: [your ObjectId]를 사용하여 Win_App_SDK_Push@microsoft.com 이메일로 PFN(패키지 패밀리 이름) 매핑 요청을 만듭니다. 매핑 요청은 매주 완료됩니다. 매핑 요청이 완료되면 알림이 표시됩니다.
Azure AppId, ObjectId 및 비밀이 있으면 아래 샘플 코드에 해당 자격 증명을 추가할 수 있습니다.
푸시 알림을 받도록 앱 구성
1단계: Windows 앱 SDK 및 필수 NuGet 패키지 추가
그런 다음, 솔루션 탐색기 솔루션을 마우스 오른쪽 단추로 클릭하고 NuGet 패키지 관리 선택합니다.
패키지 관리자 다음 패키지를 추가합니다.
- Microsoft. WindowsAppSDK(최소 버전 1.1.0)
- Microsoft. Windows. Sdk. BuildTools(최소 버전 10.0.22000.194)
- Microsoft. Windows. CppWinRT( 최소 버전 2.0.210930.14)
- Microsoft. Windows. ImplementationLibrary(최소 버전 1.0.210930.1)
프로젝트에서 Windows 앱 SDK 처음 사용하고 외부 위치로 패키지되거나 패키지되지 않은 경우 프로젝트 파일에 다음 속성을 추가하여 Windows 앱 SDK 초기화합니다.
<!-- your .vcxproj or .proj file -->
<PropertyGroup Label="Globals">
    <!-- Other properties -->
    <WindowsPackageType>None</WindowsPackageType>
</PropertyGroup>
또는 부트스트래퍼 API를 사용합니다. 자세한 내용은 외부 위치로 패키지되거나 패키지되지 않은 앱에 Windows 앱 SDK 런타임 사용을 참조하세요.
Note
SDK가 초기화되지 않으면 앱이 throw System.Runtime.InteropServices.COMException (0x80040154): Class not registered (0x80040154 (REGDB_E_CLASSNOTREG)) 되고 실행되지 않습니다.
2단계: 네임스페이스 추가
다음으로, Windows 앱 SDK 푸시 알림 Microsoft.Windows.PushNotifications 대한 네임스페이스를 추가합니다.
#include <winrt/Microsoft.Windows.PushNotifications.h>

using namespace winrt::Microsoft::Windows::PushNotifications;
"Microsoft.Windows.PushNotifications" 오류가 발생하면, 이는 헤더 파일이 생성되지 않았을 가능성이 높습니다. 해결하려면 위의 패키지가 설치되어 있는지 확인하고, 오류를 일으키는 include 및 using 문을 주석 처리한 다음, 애플리케이션을 다시 빌드하여 헤더 파일을 생성합니다. 빌드가 성공하면 'include'와 'using' 문에서 주석을 제거한 후 프로젝트를 다시 빌드합니다. 이렇게 하면 오류가 해결됩니다.
3단계: 앱 매니페스트에 COM 활성화기 추가
Important
앱의 패키지가 해제된 경우(즉, 런타임에 패키지 ID가 없음) 4단계로 건너뜁니다. 앱 시작 시 푸시 알림에 등록하고 응답합니다.
앱이 패키지된 경우(외부 위치로 패키지된 경우 포함): Package.appxmanifest를 엽니다. 요소 내부에 다음을 추가합니다 <Application> .
Id및 ExecutableDisplayName 값을 앱과 관련된 값으로 바꿉습니다.
<!--Packaged apps only-->
<!--package.appxmanifest-->

<Package
  ...
  xmlns:com="http://schemas.microsoft.com/appx/manifest/com/windows10"
  ...
  <Applications>
    <Application>
      ...
      <Extensions>

        <!--Register COM activator-->
        <com:Extension Category="windows.comServer">
          <com:ComServer>
              <com:ExeServer Executable="SampleApp\SampleApp.exe" DisplayName="SampleApp" Arguments="----WindowsAppRuntimePushServer:">
                <com:Class Id="[Your app's Azure AppId]" DisplayName="Windows App SDK Push" />
            </com:ExeServer>
          </com:ComServer>
        </com:Extension>

      </Extensions>
    </Application>
  </Applications>
 </Package>
Note
Id
<com:Class> 특성은 Azure AD 앱 등록에서 Azure AppId(애플리케이션(클라이언트) ID)로 설정해야 합니다. 이는 Windows 앱 SDK 앱의 COM 활성화를 Azure ID에 연결하는 방법입니다. WNS가 백그라운드 푸시 알림을 제공하기 위해 앱을 활성화할 때 이 GUID를 사용하여 올바른 COM 서버를 찾아서 시작합니다. 위의 1단계에서 설명한 것과 동일한 Azure AppId 값을 사용합니다.
Note
이 예제에 대해 완료된 C++ 클래스의 예제는 5단계 후에 찾을 수 있습니다. 4단계와 5단계는 최종 예제의 각 부분을 추가하는 단계별 지침을 제공합니다.
4단계: 앱 시작 시 푸시 알림 등록 및 응답
다음을 추가하도록 앱의 main() 메서드를 업데이트합니다.
- 앱을 푸시 알림 수신 상태로 등록하려면 PushNotificationManager::Default().Register() 을(를) 호출하세요.
- AppInstance::GetCurrent().GetActivatedEventArgs()를 호출하여 활성화 요청의 원본을 확인하십시오. 푸시 알림에서 활성화가 트리거된 경우 알림의 페이로드에 따라 응답합니다.
Important
PushNotificationManager::Default().Register를 호출한 후 AppInstance.GetCurrent.GetActivatedEventArgs를 호출해야 합니다.
포그라운드 이벤트 처리기 추가
포그라운드에서 이벤트를 처리하려면 PushNotificationManager.PushReceived에 대한 처리기를 등록합니다.
Important
또한 PushNotificationManager.Register()를 호출하기 전에 PushNotificationManager.PushReceived 이벤트 처리기를 등록해야 합니다. 그렇지 않으면 런타임 예외가 발생합니다.
System.Runtime.InteropServices.COMException: Element not found. Must register event handlers before calling Register().
PushNotificationManager::IsSupported() 확인 추가
다음으로 PushNotificationManager.IsSupported()에서 PushNotification API가 지원되는지 확인합니다. 그렇지 않은 경우 폴링 또는 사용자 지정 소켓 구현을 사용하는 것이 좋습니다.
푸시 알림 지원이 확인되었으므로 PushNotificationReceivedEventArgs에 따라 동작을 추가합니다.
5단계: WNS 채널 URI를 요청하고 WNS 서버에 등록
WNS 채널 URI는 푸시 알림을 보내기 위한 HTTP 엔드포인트입니다. 각 클라이언트는 채널 URI를 요청하고 푸시 알림을 받으려면 WNS 서버에 등록해야 합니다.
Note
WNS 채널 URI는 30일 후에 만료됩니다. 이전 URI를 캐싱하지 않고 모든 앱 시작 시 새 채널 URI를 요청합니다. 새 URI가 백 엔드가 저장한 것과 다른 경우 업데이트된 URI를 클라우드 서비스로 보내 레코드를 최신 상태로 유지할 수 있습니다. URI가 세션 간에 안정적으로 유지된다고 가정하지 마세요. URI를 변경 가능한 세션 범위 값으로 처리하면 만료되거나 부실 채널 URI로 인한 자동 배달 오류를 방지할 수 있습니다.
auto channelOperation{ PushNotificationManager::Default().CreateChannelAsync(winrt::guid("[Your app's Azure ObjectID]")) };
자습서 코드를 따르는 경우 여기에 Azure 개체 ID를 추가합니다.
// To obtain an AAD RemoteIdentifier for your app,
// follow the instructions on https://dotnet.territoriali.olinfo.it/azure/active-directory/develop/quickstart-register-app
winrt::guid remoteId{ "00000000-0000-0000-0000-000000000000" }; // Replace this with your own Azure ObjectId
PushNotificationManager가 채널 URI를 생성하려고 시도하며, 최대 15분 동안 자동으로 재시도합니다. 호출이 완료되기를 기다리는 이벤트 처리기를 만듭니다. 호출이 완료되면 WNS 서버에 URI를 등록합니다.
예제 코드
#include <iostream>
#include <winrt/Microsoft.Windows.PushNotifications.h>
#include <winrt/Windows.Foundation.h>
#include <winrt/Microsoft.Windows.AppLifecycle.h>
#include <winrt/Windows.ApplicationModel.Background.h>
#include <wil/cppwinrt.h>
#include <wil/result.h>

using namespace winrt::Microsoft::Windows::PushNotifications;
using namespace winrt::Windows::Foundation;
using namespace winrt::Microsoft::Windows::AppLifecycle;

// To obtain an AAD RemoteIdentifier for your app,
// follow the instructions on https://dotnet.territoriali.olinfo.it/azure/active-directory/develop/quickstart-register-app
winrt::guid remoteId{ "00000000-0000-0000-0000-000000000000" }; // Replace this with your own Azure ObjectId

winrt::Windows::Foundation::IAsyncOperation<PushNotificationChannel> RequestChannelAsync()
{
    auto channelOperation = PushNotificationManager::Default().CreateChannelAsync(remoteId);

    // Set up the in-progress event handler
    channelOperation.Progress(
        [](auto&& sender, auto&& args)
        {
            if (args.status == PushNotificationChannelStatus::InProgress)
            {
                // This is basically a noop since it isn't really an error state
                std::cout << "Channel request is in progress." << std::endl << std::endl;
            }
            else if (args.status == PushNotificationChannelStatus::InProgressRetry)
            {
                LOG_HR_MSG(
                    args.extendedError,
                    "The channel request is in back-off retry mode because of a retryable error! Expect delays in acquiring it. RetryCount = %d",
                    args.retryCount);
            }
        });

    auto result = co_await channelOperation;

    if (result.Status() == PushNotificationChannelStatus::CompletedSuccess)
    {
        auto channelUri = result.Channel().Uri();

        std::cout << "channelUri: " << winrt::to_string(channelUri.ToString()) << std::endl << std::endl;

        auto channelExpiry = result.Channel().ExpirationTime();

        // Caller's responsibility to keep the channel alive
        co_return result.Channel();
    }
    else if (result.Status() == PushNotificationChannelStatus::CompletedFailure)
    {
        LOG_HR_MSG(result.ExtendedError(), "We hit a critical non-retryable error with channel request!");
        co_return nullptr;
    }
    else
    {
        LOG_HR_MSG(result.ExtendedError(), "Some other failure occurred.");
        co_return nullptr;
    }

};

PushNotificationChannel RequestChannel()
{
    auto task = RequestChannelAsync();
    if (task.wait_for(std::chrono::seconds(300)) != AsyncStatus::Completed)
    {
        task.Cancel();
        return nullptr;
    }

    auto result = task.GetResults();
    return result;
}

void SubscribeForegroundEventHandler()
{
    winrt::event_token token{ PushNotificationManager::Default().PushReceived([](auto const&, PushNotificationReceivedEventArgs const& args)
    {
        auto payload{ args.Payload() };

        std::string payloadString(payload.begin(), payload.end());
        std::cout << "\nPush notification content received in the FOREGROUND: " << payloadString << std::endl;
    }) };

    std::cout << "Push notification foreground event handler registered." << std::endl;
}

int main()
{
    // Set up an event handler, so we can receive notifications in the foreground while the app is running.
    // You must register notification event handlers before calling Register(). Otherwise, the following runtime
    // exception will be thrown: System.Runtime.InteropServices.COMException: 'Element not found. Must register
    // event handlers before calling Register().'
    SubscribeForegroundEventHandler();

    // Register the app for push notifications.
    PushNotificationManager::Default().Register();

    auto args{ AppInstance::GetCurrent().GetActivatedEventArgs() };
    switch (args.Kind())
    {
        case ExtendedActivationKind::Launch:
        {
            std::cout << "App launched by user or from the debugger." << std::endl;
            if (PushNotificationManager::IsSupported())
            {
                std::cout << "Push notifications are supported on this device." << std::endl;

                // Request a WNS Channel URI which can be passed off to an external app to send notifications to.
                // The WNS Channel URI uniquely identifies this app for this user and device.
                PushNotificationChannel channel{ RequestChannel() };
                if (!channel)
                {
                    std::cout << "\nThere was an error obtaining the WNS Channel URI" << std::endl;

                    if (remoteId == winrt::guid{ "00000000-0000-0000-0000-000000000000" })
                    {
                        std::cout << "\nThe ObjectID has not been set. Refer to the readme file accompanying this sample\nfor the instructions on how to obtain and setup an ObjectID" << std::endl;
                    }
                }

                std::cout << "\nPress 'Enter' at any time to exit App." << std::endl;
                std::cin.ignore();
            }
            else
            {
                std::cout << "Push notifications are NOT supported on this device." << std::endl;
                std::cout << "App implements its own custom socket here to receive messages from the cloud since Push APIs are unsupported." << std::endl;
                std::cin.ignore();
            }
        }
        break;

        case ExtendedActivationKind::Push:
        {
            std::cout << "App activated via push notification." << std::endl;
            PushNotificationReceivedEventArgs pushArgs{ args.Data().as<PushNotificationReceivedEventArgs>() };

            // Call GetDeferral to ensure that code runs in low power
            auto deferral{ pushArgs.GetDeferral() };

            auto payload{ pushArgs.Payload() };

            // Do stuff to process the raw notification payload
            std::string payloadString(payload.begin(), payload.end());
            std::cout << "\nPush notification content received in the BACKGROUND: " << payloadString.c_str() << std::endl;
            std::cout << "\nPress 'Enter' to exit the App." << std::endl;

            // Call Complete on the deferral when finished processing the payload.
            // This removes the override that kept the app running even when the system was in a low power mode.

            deferral.Complete();
            std::cin.ignore();
        }
        break;

        default:
            std::cout << "\nUnexpected activation type" << std::endl;
            std::cout << "\nPress 'Enter' to exit the App." << std::endl;
            std::cin.ignore();
            break;
    }
}
6단계: 앱 빌드 및 설치
Visual Studio 사용하여 앱을 빌드하고 설치합니다. 솔루션 탐색기 솔루션 파일을 마우스 오른쪽 단추로 클릭하고 Deploy 선택합니다. Visual Studio 앱을 빌드하고 컴퓨터에 설치합니다. 시작 메뉴 또는 Visual Studio 디버거를 통해 앱을 실행하여 실행할 수 있습니다.
자습서 코드의 콘솔은 다음과 같습니다.
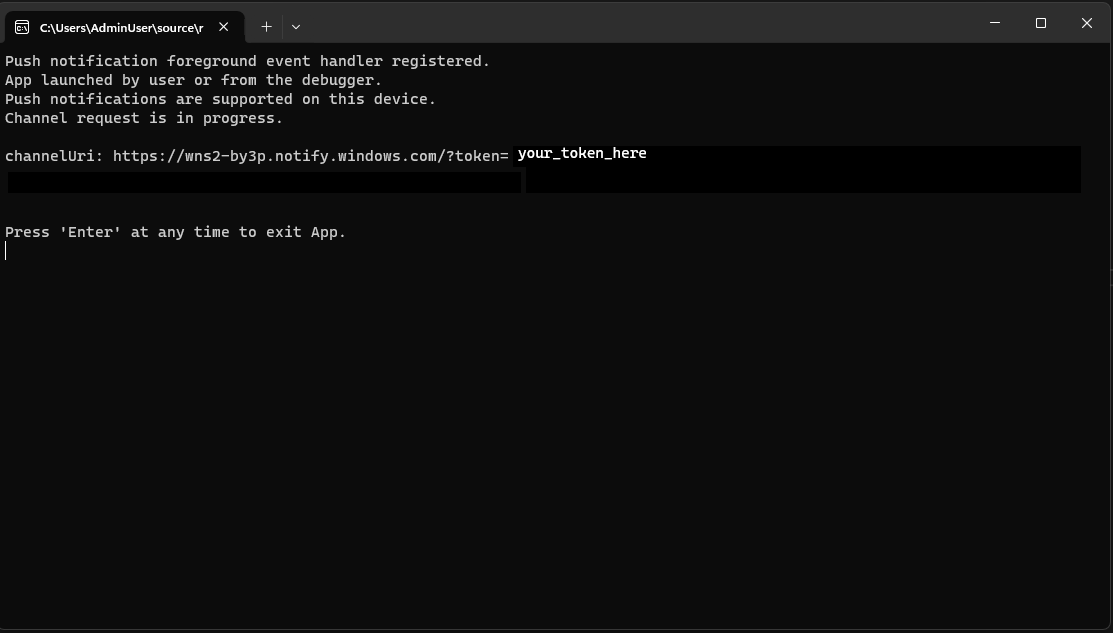
앱에 푸시 알림을 보내려면 토큰이 필요합니다.
앱에 푸시 알림 보내기
이 시점에서 모든 구성이 완료되고 WNS 서버가 클라이언트 앱에 푸시 알림을 보낼 수 있습니다. 다음 단계에서는 자세한 내용은 푸시 알림 서버 요청 및 응답 헤더을 참조하세요.
1단계: 액세스 토큰 요청
푸시 알림을 보내려면 WNS 서버가 먼저 액세스 토큰을 요청해야 합니다. Azure TenantId, Azure AppId 및 비밀을 사용하여 HTTP POST 요청을 보냅니다. Azure TenantId 및 Azure AppId를 검색하는 방법에 대한 자세한 내용은 로그인에 대한 테넌트 및 앱 ID 값 만들기 참조하세요.
HTTP 샘플 요청:
POST /{tenantID}/oauth2/v2.0/token Http/1.1
Host: login.microsoftonline.com
Content-Type: application/x-www-form-urlencoded
Content-Length: 160

grant_type=client_credentials&client_id=<Azure_App_Registration_AppId_Here>&client_secret=<Azure_App_Registration_Secret_Here>&scope=https://wns.windows.com/.default/
C# 샘플 요청:
//Sample C# Access token request
var client = new RestClient("https://login.microsoftonline.com/{tenantID}/oauth2/v2.0");
var request = new RestRequest("/token", Method.Post);
request.AddHeader("Content-Type", "application/x-www-form-urlencoded");
request.AddParameter("grant_type", "client_credentials");
request.AddParameter("client_id", "[Your app's Azure AppId]");
request.AddParameter("client_secret", "[Your app's secret]");
request.AddParameter("scope", "https://wns.windows.com/.default");
RestResponse response = await client.ExecutePostAsync(request);
Console.WriteLine(response.Content);
요청이 성공하면 access_token 필드에 토큰이 포함된 응답을 받게 됩니다.
{
    "token_type":"Bearer",
    "expires_in":"86399",
    "ext_expires_in":"86399",
    "expires_on":"1653771789",
    "not_before":"1653685089",
    "access_token":"[your access token]"
}
2단계. 원시 알림 보내기
이전 단계에서 얻은 액세스 토큰과 보내려는 푸시 알림의 콘텐츠가 포함된 HTTP POST 요청을 만듭니다. 푸시 알림의 콘텐츠가 앱에 전달됩니다.
POST /?token=[The token query string parameter from your channel URL. E.g. AwYAAABa5cJ3...] HTTP/1.1
Host: dm3p.notify.windows.com
Content-Type: application/octet-stream
X-WNS-Type: wns/raw
Authorization: Bearer [your access token]
Content-Length: 46

{ Sync: "Hello from the Contoso App Service" }
var client = new RestClient("[Your channel URL. E.g. https://wns2-by3p.notify.windows.com/?token=AwYAAABa5cJ3...]");
var request = new RestRequest();
request.Method = Method.Post;
request.AddHeader("Content-Type", "application/octet-stream");
request.AddHeader("X-WNS-Type", "wns/raw");
request.AddHeader("Authorization", "Bearer [your access token]");
request.AddBody("Notification body");
RestResponse response = await client.ExecutePostAsync(request);");
3단계: 클라우드 기반 앱 알림 보내기
원시 알림을 보내는 데만 관심이 있는 경우 이 단계를 무시합니다. 푸시 토스트 알림이라고도 하는 클라우드 소스 앱 알림을 보내려면 먼저 Quickstart: Windows 앱 SDK의 앱 알림을 참조하십시오. 앱 알림은 푸시(클라우드에서 전송)하거나 로컬로 보낼 수 있습니다. 클라우드 소스 앱 알림을 보내는 것은 2단계에서 원시 알림을 보내는 것과 비슷하지만, X-WNS-Type 헤더는 toast이며, Content-Type은 text/xml이고, 콘텐츠에는 앱 알림 XML 페이로드가 포함됩니다. XML 페이로드를 생성하는 방법에 대한 자세한 내용은 알림 XML 스키마 를 참조하세요.
전송하려는 클라우드 원본 앱 알림의 콘텐츠 및 액세스 토큰을 포함하는 HTTP POST 요청을 만듭니다. 푸시 알림의 콘텐츠가 앱에 전달됩니다.
POST /?token=AwYAAAB%2fQAhYEiAESPobjHzQcwGCTjHu%2f%2fP3CCNDcyfyvgbK5xD3kztniW%2bjba1b3aSSun58SA326GMxuzZooJYwtpgzL9AusPDES2alyQ8CHvW94cO5VuxxLDVzrSzdO1ZVgm%2bNSB9BAzOASvHqkMHQhsDy HTTP/1.1
Host: dm3p.notify.windows.com
Content-Type: text/xml
X-WNS-Type: wns/toast
Authorization: Bearer [your access token]
Content-Length: 180

<toast><visual><binding template="ToastGeneric"><text>Example cloud toast notification</text><text>This is an example cloud notification using XML</text></binding></visual></toast>
var client = new RestClient("https://dm3p.notify.windows.com/?token=AwYAAAB%2fQAhYEiAESPobjHzQcwGCTjHu%2f%2fP3CCNDcyfyvgbK5xD3kztniW%2bjba1b3aSSun58SA326GMxuzZooJYwtpgzL9AusPDES2alyQ8CHvW94cO5VuxxLDVzrSzdO1ZVgm%2bNSB9BAzOASvHqkMHQhsDy");
client.Timeout = -1;

var request = new RestRequest(Method.POST);
request.AddHeader("Content-Type", "text/xml");
request.AddHeader("X-WNS-Type", "wns/toast");
request.AddHeader("Authorization", "Bearer <AccessToken>");
request.AddParameter("text/xml", "<toast><visual><binding template=\"ToastGeneric\"><text>Example cloud toast notification</text><text>This is an example cloud notification using XML</text></binding></visual></toast>",  ParameterType.RequestBody);
Console.WriteLine(response.Content);
Resources
GitHub에서 Microsoft와 공동 작업
이 콘텐츠의 원본은 GitHub에서 찾을 수 있으며, 여기서 문제와 끌어오기 요청을 만들고 검토할 수도 있습니다. 자세한 내용은 참여자 가이드를 참조하세요.

Windows developer