Microsoft Copilot Studio 에이전트를 로컬 컴퓨터에 복제하는 경우 Microsoft Visual Studio Code 텍스트 편집 기능을 사용하여 해당 구성 요소를 편집할 수 있습니다. Copilot Studio 확장은 편집 효율적이고 오류가 없는 IntelliSense, 유효성 검사 및 YAML 언어 지원을 제공합니다.
에이전트 파일 구조
파일 구조를 이해하는 것이 효율적인 편집의 핵심입니다.
my-agent/
├── actions                   # Connectors
│   ├── DevOpsAction.mcs.yml
│   └── GetItems.mcs.yml
├── knowledge/files                # Knowledge sources
│   ├── source1.yaml
│   └── source2.yaml
├── topics/                   # Conversation topics
│   ├── greeting.mcs.yaml
│   ├── help.mcs.yaml
│   └── escalate.mcs.yaml
├── workflows/                    # Agent tools and actions
│   └── GetDevOpsItems
│       ├── metadata.yaml
│       └── workflow.json
│   └── GetMeetings
│       ├── metadata.yaml
│       └── workflow.json
├── trigger/                 # Event triggers
│   └── welcometrigger.mcs.yaml
├── agent.mcs.yaml                # Main agent definition
├── icon.png                      # Icon used for the agent, visible in test panel and in supported channels
├── settings.mcs.yml              # Configuration settings for the agent
└── connectioreferences.mcs.yml   # Connection References used by Connectors and other actions
메인 에이전트 구성 편집
인텔리센스 기능
입력하는 동안 제안이 표시되고 잘못된 값은 강조 표시됩니다. 이 제안들은 노드 레벨에 따라 달라집니다.
- 노드 레벨에 따라 제안을 받을 수 있도록 사용
Ctrl+Space하세요. -
Ctrl+F변수 이름과 에이전트 전체의 다른 정보를 검색하여 빠르게 업데이트하세요
문제 보기
Visual Studio Code Problems 창에서 파일 문제를 볼 수 있습니다. 또한, 파일을 열면 문제를 나타내는 빨간색 밑줄을 볼 수 있습니다.
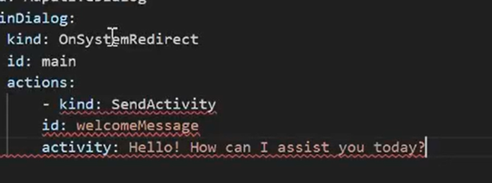
문제 창
Ctrl+Shift+M를 사용하여 문제 창을 열거나, 보기>문제로 이동하세요.모든 오류 및 경고를 확인하세요.
문제를 선택하여 해당 위치로 이동하세요.
변화와 함께 일하기
변경 내용이 만들어지고 저장되면 Visual Studio 다른 색으로 표시되므로 쉽게 식별할 수 있습니다.
에이전트 컴포넌트 수정
Topics
주제는 대화의 흐름과 대화를 정의합니다. 이들은 AdaptiveDialog의 일종입니다.
GitHub Copilot 또는 다른 에이전트를 사용하여 새로운 구성 요소를 빌드하거나 원하는 경우 고유한 항목을 작성할 수 있습니다.
주제 파일 구조
간단한 인사 주제의 예시를 소개합니다:
# This is the name of the topic that will appear in the 'topics' list in Copilot Studio
kind: AdaptiveDialog
beginDialog:
  kind: OnConversationStart
  id: main
  actions:
    - kind: SendActivity
      id: sendMessage_M0LuhV
      activity:
        text:
          - Hello, I'm {System.Bot.Name}. How can I help?
        speak:
          - Hello and thank you for calling {System.Bot.Name}.
고급 주제 기능
다음과 같은 주제에서 다른 구성 요소를 사용할 수 있습니다:
-
- kind: Question id: question_1 alwaysPrompt: true variable: init:Topic.Continue prompt: Can I help with anything else? entity: BooleanPrebuiltEntity -
  actions:
    - kind: Question
      id: 41d42054-d4cb-4e90-b922-2b16b37fe379
      conversationOutcome: ResolvedImplied
      alwaysPrompt: true
      variable: init:Topic.SurveyResponse
      prompt: Did that answer your question?
      entity: BooleanPrebuiltEntity
파워 익스를 사용하는 조건:
            - kind: ConditionGroup
              id: condition-1
              conditions:
                - id: condition-1-item-0
                  condition: =Topic.Continue = true
                  actions:
                    - kind: SendActivity
                      id: sendMessage_4eOE6h
                      activity: Go ahead. I'm listening.
다른 노드들, 예를 들어 HTTP 노드
적응형 카드
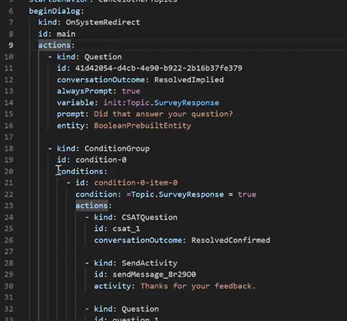
도구
도구는 에이전트가 수행할 수 있는 동작을 정의합니다. Copilot Studio 에이전트 UI의 Tools 영역에서 볼 수 있습니다.
도구에는 다음이 포함될 수 있습니다:
- 프롬프트
- 워크플로(Power Automate 흐름)
- CUA 도구
- 사용자 지정 커넥터
- REST API
- MCP 커넥터
도구는 확장 프로그램 내에서 에이전트의 /actions 폴더 아래에 나타나지만, 추가 메타데이터가 있는 다른 폴더에도 나타날 수 있습니다. 예를 들어, 워크플로우 와 트리거 는 각각 폴더와 JSON 파일을 가지고 있습니다.
편집 트리거
트리거는 주제나 행동이 언제 활성화되는지 정의합니다. 일정, 이벤트, 조건 타입으로 설정할 수 있습니다. 트리거는 보통 워크플로우를 참조합니다.
kind: ExternalTriggerConfiguration
externalTriggerSource:
  kind: WorkflowExternalTrigger
원격 지식 파일 관리
Copilot Studio에서 업로드 기능을 사용하여 문서를 업로드하는 경우 이러한 문서는 Remote 지식 파일 창에서 이름을 클릭하여 다운로드할 수 있습니다. 문서는 자동으로 다운로드되지 않으며 창에서 다운로드를 선택해야 합니다. 다운로드가 성공하면 알림이 뜹니다.
새 파일을 업로드하고 싶으면 에이전트 정의의 폴더에 knowledge/files 넣을 수 있습니다. 변경 사항을 적용하면 에이전트 콘텐츠 업로드 기능을 통해 업로드됩니다.
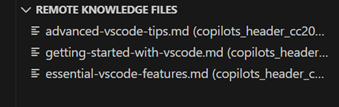
모범 사례
명명 규칙
파일:
- 케밥 케이스 사용:
create-ticket.tool.yaml - 구체적으로 작성:
faq.yaml이 아니라product-pricing-faq.yaml - 타입 접미사 사용:
.topic.yaml,.tool.yaml,.trigger.yaml
ID 및 변수:
- camelCase를 사용하세요:
userOrderNumber,productDetails - 구체적으로 작성:
check1이 아니라checkPaymentStatus - 약어를 사용하지 마십시오:
customerEmail대신custEmail사용하십시오.
코멘트
복잡한 논리를 설명하기 위해 다음과 같은 주석을 추가하세요:
nodes:
  # Check if user is within business hours and eligible for live support
  # Business hours: 9 AM - 5 PM EST, Monday-Friday
  # Eligibility: Premium tier customers only
  - id: check-live-support-availability
    type: condition
다음 단계
이제 편집을 이해했으니:
- 동기화에 대해 배우세요.