이 빠른 시작에서는 런타임 시 MIP SDK .NET 래퍼에서 사용하는 클라이언트 초기화 패턴을 구현하는 방법을 보여 줍니다.
비고
이 빠른 시작에 설명된 단계는 MIP .NET 래퍼의 보호 SDK를 사용하는 모든 클라이언트 애플리케이션에 필요합니다. 이러한 빠른 시작은 애플리케이션 초기화 및 인증 대리자 및 동의 대리자 클래스 구현 후에 직렬로 수행해야 합니다.
필수 조건
아직 없는 경우 다음을 수행해야 합니다.
- MIP(Microsoft Information Protection) SDK 설정 및 구성의 단계를 완료합니다. 이 "보호 프로필 및 엔진 설정" 빠른 시작은 적절한 SDK 설정 및 구성을 사용합니다.
- 옵션으로:
- 프로필 및 엔진 개체를 검토합니다. 프로필 및 엔진 개체는 MIP 파일/정책/보호 SDK를 사용하는 클라이언트에서 요구하는 범용 개념입니다.
- 인증 개념을 검토하여 SDK 및 클라이언트 애플리케이션에서 인증 및 동의를 구현하는 방법을 알아봅니다.
Visual Studio 솔루션 및 프로젝트 만들기
먼저 다른 Quickstarts가 기반으로 삼을 초기 Visual Studio 솔루션 및 프로젝트를 만들고 구성합니다.
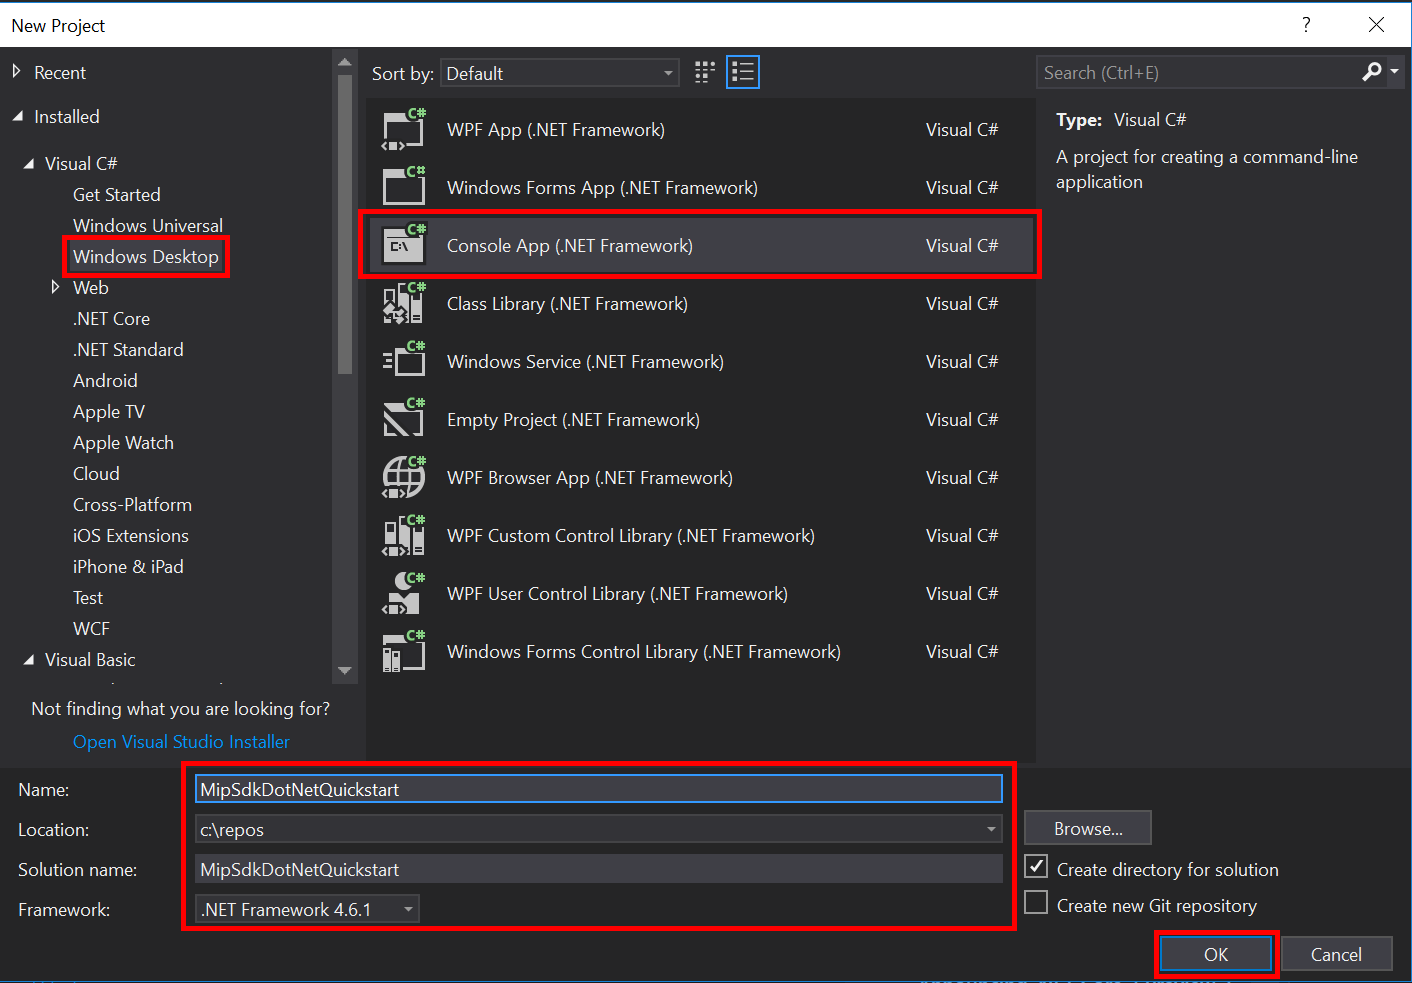
Visual Studio 2022 이상을 열고 파일 메뉴, 새로 만들기, 프로젝트를 선택합니다. 새 프로젝트 대화 상자에서 다음을 수행합니다.
왼쪽 창의 설치됨, Visual C#에서 Windows 데스크톱을 선택합니다.
가운데 창에서 콘솔 앱(.NET Framework)을 선택합니다.
아래쪽 창에서 프로젝트 이름, 위치 및 포함된 솔루션 이름을 적절하게 업데이트합니다.
완료되면 오른쪽 아래에 있는 확인 단추를 클릭합니다.
MIP 파일 SDK에 대한 NuGet 패키지를 프로젝트에 추가합니다.
- 솔루션 탐색기에서 프로젝트 노드(위쪽/솔루션 노드 바로 아래)를 마우스 오른쪽 단추로 클릭하고 NuGet 패키지 관리를 선택합니다.
- 편집기 그룹 탭 영역에서 NuGet 패키지 관리자 탭이 열리는 경우:
- 찾아보기를 선택합니다.
- 검색 상자에 "Microsoft.InformationProtection"을 입력합니다.
- "Microsoft.InformationProtection.Protection" 패키지를 선택합니다.
- "설치"를 클릭한 다음 미리 보기 변경 내용 확인 대화 상자가 표시되면 "확인"을 클릭합니다.
위의 단계를 반복하지만 대신 애플리케이션에 "Microsoft.Identity.Client"(MSAL)를 추가합니다.

인증 대리자 및 동의 대리자 구현
아직 구현되지 않은 경우 인증 및 동의 대리자를 구현하기 위해 파일 SDK 애플리케이션 초기화 에 나열된 단계를 따릅니다.
MIP SDK 관리 래퍼 초기화
솔루션 탐색기에서 메서드 구현
Main()이 포함된 프로젝트에서 .cs 파일을 엽니다. 프로젝트를 생성할 때 지정한 이름을 포함하는 프로젝트와 동일한 이름으로 기본값이 설정됩니다.생성된 구현
main()을(를) 제거합니다.관리되는 래퍼에는 초기화,
Microsoft.InformationProtection.MIP프로필 만들기MipContext, 프로필 로드 및 리소스 해제에 사용되는 정적 클래스가 포함되어 있습니다. 파일 SDK 작업에 대한 래퍼를 초기화하려면MIP.Initialize()을(를) 호출하고,MipComponent.Protection을(를) 전달하여 보호 작업에 필요한 라이브러리를 로드합니다.Main()Program.cs 애플리케이션 ID<를 이전에 만든 Microsoft Entra 애플리케이션 등록의 ID로 바꿔>서 다음을 추가합니다.
using System;
using System.Threading.Tasks;
using Microsoft.InformationProtection;
using Microsoft.InformationProtection.Exceptions;
using Microsoft.InformationProtection.Protection;

namespace mip_sdk_dotnet_quickstart
{
    class Program
    {
        private const string clientId = "<application-id>";
        private const string appName = "<friendly-name>";

        static void Main(string[] args)
        {
            //Initialize Wrapper for Protection SDK operations
            MIP.Initialize(MipComponent.Protection);
        }
    }
}
보호 프로필 및 엔진 생성
언급했듯이 MIP API를 사용하는 SDK 클라이언트에는 프로필 및 엔진 개체가 필요합니다. 네이티브 DLL을 로드하는 코드를 추가한 다음 프로필 및 엔진 개체를 인스턴스화하여 이 빠른 시작의 코딩 부분을 완료합니다.
using System;
using System.Threading.Tasks;
using Microsoft.InformationProtection;
using Microsoft.InformationProtection.Exceptions;
using Microsoft.InformationProtection.Protection;

namespace mip_sdk_dotnet_quickstart
{
     class Program
     {
          private const string clientId = "<application-id>";
          private const string appName = "<friendly-name>";

          static void Main(string[] args)
          {
               // Initialize Wrapper for Protection SDK operations.
               MIP.Initialize(MipComponent.Protection);

               // Create ApplicationInfo, setting the clientID from Azure AD App Registration as the ApplicationId.
               ApplicationInfo appInfo = new ApplicationInfo()
               {
                    ApplicationId = clientId,
                    ApplicationName = appName,
                    ApplicationVersion = "1.0.0"
               };

               // Instantiate the AuthDelegateImpl object, passing in AppInfo.
               AuthDelegateImplementation authDelegate = new AuthDelegateImplementation(appInfo);

               // Create MipConfiguration Object
               MipConfiguration mipConfiguration = new MipConfiguration(appInfo, "mip_data", LogLevel.Trace, false);

               // Create MipContext using Configuration
               mipContext = MIP.CreateMipContext(mipConfiguration);

               // Initialize and instantiate the ProtectionProfile.
               // Create the ProtectionProfileSettings object.
               // Initialize protection profile settings to create/use local state.
               var profileSettings = new ProtectionProfileSettings(mipContext,
                                        CacheStorageType.OnDiskEncrypted,
                                        new ConsentDelegateImplementation());

               // Load the Profile async and wait for the result.
               var protectionProfile = Task.Run(async () => await MIP.LoadProtectionProfileAsync(profileSettings)).Result;

               // Create a ProtectionEngineSettings object, then use that to add an engine to the profile.
               var engineSettings = new ProtectionEngineSettings("user1@tenant.com", authDelegate, "", "en-US");
               engineSettings.Identity = new Identity("user1@tenant.com");
               var protectionEngine = Task.Run(async () => await protectionProfile.AddEngineAsync(engineSettings)).Result;

               // Application Shutdown
               // handler = null; // This will be used in later quick starts.
               protectionEngine = null;
               protectionProfile = null;
               mipContext = null;
          }
     }
}
다음 값을 사용하여 붙여넣은 소스 코드의 자리 표시자 값을 바꿉합니다.
Placeholder 가치 Example <application-id> "MIP SDK 설정 및 구성"(2개 인스턴스)에 등록된 애플리케이션에 할당된 Microsoft Entra 애플리케이션 ID입니다. 0edbblll-8773-44de-b87c-b8c6276d41eb <사용자 친화적 이름> 사용자가 설정할 수 있는 애플리케이션의 친숙한 이름입니다. 앱 초기화 이제 애플리케이션의 최종 빌드를 수행하고 오류를 해결합니다. 코드가 성공적으로 빌드되어야 합니다.
다음 단계
이제 초기화 코드가 완료되었으므로 MIP Protection SDK를 경험할 수 있는 다음 빠른 시작을 준비했습니다.