Exercise - Define resources in a Bicep file
Note
This exercise is optional. If you want to complete this exercise, you'll need to create an Azure subscription before you begin. If you don't have an Azure account or you don't want to create one at this time, you can read through the instructions so you understand the information that's being presented.
Note
You need to use a resource group to complete the steps in this exercise. You can use a resource group that you already created, or you can create a new resource group specifically for this exercise. If you choose to create a new resource group, that will make it easier to clean up any resources that you create as you complete the exercise. If you don't have an existing resource group or you want to create a new one specifically for this exercise, you can follow the steps in Use the Azure portal and Azure Resource Manager to manage resource groups to create a resource group by using the Azure portal, or you can follow the steps in Manage Azure resource groups by using Azure CLI to create a resource group by using the the Azure CLI.
For your toy-launch website, you decide to first create a proof of concept by creating a basic Bicep file. In this exercise, you'll create a storage account, Azure App Service plan, and app. Later, you'll modify the file to make it more reusable.
During the process, you'll:
- Create a Bicep file that defines a single storage account resource that includes hard-coded values.
- Provision your infrastructure and verify the result.
- Add an App Service plan and app to the Bicep file.
- Provision the infrastructure again to see the new resources.
This exercise uses the Bicep extension for Visual Studio Code. Be sure to install this extension in Visual Studio Code.
Create a Bicep file that contains a storage account
Open Visual Studio Code.
Create a new Bicep file called main.bicep.
Save the empty file so that Visual Studio Code loads the Bicep tooling.
You can either select File > Save As or select Ctrl+S in Windows (⌘+S on macOS). Be sure to remember where you've saved the file. For example, you might want to create a files folder in which to save the file.
Add the following Bicep code into the Bicep file. You'll deploy the file soon. It's a good idea to type the code yourself instead of copying and pasting so you can see how the tooling helps you to write your Bicep files.
resource storageAccount 'Microsoft.Storage/storageAccounts@2023-05-01' = {
  name: 'toylaunchstorage'
  location: 'eastus'
  sku: {
    name: 'Standard_LRS'
  }
  kind: 'StorageV2'
  properties: {
    accessTier: 'Hot'
  }
}
Tip
Bicep is strict about where you put line breaks, so make sure you don't put line breaks in different places than listed here.
Notice that Visual Studio Code automatically suggests property names as you type. The Bicep extension for Visual Studio Code understands the resources you're defining in your Bicep file, and it lists the available properties and values that you can use.
Update the name of the storage account from
toylaunchstorageto something that's likely to be unique, because every storage account needs a globally unique name. Make sure the name is 3 to 24 characters and includes only lowercase letters and numbers.Important
Don't skip this step. If you do, your Bicep file won't deploy successfully.
Save the changes to the file.
Deploy the Bicep file to Azure
To deploy this template to Azure, you need to sign in to your Azure account from the Visual Studio Code terminal. Be sure you've installed the Azure CLI tools.
On the Terminal menu, select New Terminal. The terminal window usually opens in the lower half of your screen.
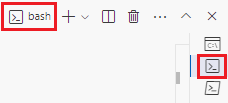
If the terminal window displays bash on the right side, it means the correct shell is already open. Alternatively, if you see a bash shell icon on the right, you can select it to launch the shell.
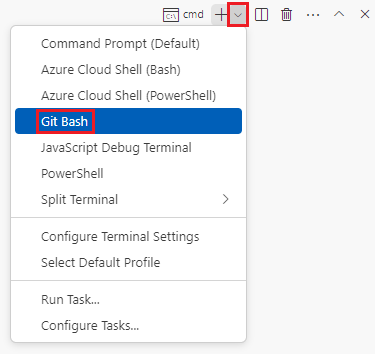
If a shell other than bash appears, select the shell dropdown arrow, and then select Git Bash.
In the terminal, go to the directory where you saved your template. For example, if you saved your template to the templates folder, you can use this command:
cd templates
Install Bicep
Run the following command to ensure you have the latest version of Bicep:
az bicep install && az bicep upgrade
Sign in to Azure by using Azure CLI
In the Visual Studio Code terminal, sign in to Azure by running the following command:
az loginIn the browser that opens, sign in to your Azure account.
The Visual Studio Code terminal displays a list of the subscriptions associated with this account.
In the list, find the subscription that you want to use for this exercise.
If you missed the list from the sign-in, you can use the following snippet to list your subscriptions again.
az account list --output tableSet the default subscription for all the Azure CLI commands that you run in this session.
az account set --subscription "Your Subscription Name or ID"
Deploy the Bicep file to Azure
Run the following command from the terminal in Visual Studio Code to deploy the Bicep file to Azure. The command can take a minute or two to complete, and then you'll see a successful deployment. If you see a warning about the location being hard-coded, you can ignore it. You'll fix the location later in the module. It's safe to proceed and the deployment will succeed.
az deployment group create --name main --template-file main.bicep
You'll see Running... in the terminal.
To deploy this template to Azure, sign in to your Azure account from the Visual Studio Code terminal. Be sure you've installed Azure PowerShell.
On the Terminal menu, select New Terminal. The terminal window usually opens in the lower half of your screen.
If the terminal window displays pwsh or powershell on the right side, it means the correct shell is already open. Alternatively, if you see a PowerShell shell icon on the right, you can select it to launch the shell.

If a shell other than pwsh or powershell appears, select the shell dropdown arrow, and then select PowerShell.

In the terminal, go to the directory where you saved your template. For example, if you saved your template in the templates folder, you can use this command:
Set-Location -Path templates
Install the Bicep CLI
To use Bicep from Azure PowerShell, install the Bicep CLI.
Sign in to Azure by using Azure PowerShell
In the Visual Studio Code terminal, sign in to Azure by running the following command:
Connect-AzAccountIn the browser that opens, sign in to your Azure account.
Get the ID of the subscription that you want to use for this exercise by running the following command:
Get-AzSubscriptionThe subscription ID is the second column. Copy the second column. It looks something like aaaa0a0a-bb1b-cc2c-dd3d-eeeeee4e4e4e.
Set the default subscription for all the Azure PowerShell commands that you run in this session.
Set-AzContext -SubscriptionId {Your subscription ID}
Deploy the Bicep file to Azure
Deploy the Bicep file to Azure by using the following Azure PowerShell command in the terminal. The command can take a minute or two to complete, and you'll see a successful deployment. If you see a warning about the location being hard-coded, you can ignore it. You'll fix the location later in the module. It's safe to proceed and the deployment will succeed.
New-AzResourceGroupDeployment -Name main -TemplateFile main.bicep
Verify the deployment
The first time you deploy a Bicep file, you might want to use the Azure portal to verify that the deployment has finished successfully and to inspect the results.
Go to the Azure portal and make sure you're in the correct subscription.
On the left-side panel, select Resource groups.
Select your resource group name.
In Overview, you can see that one deployment succeeded. You might need to expand the Essentials area to see the deployment.

Select 1 Succeeded to see the details of the deployment.

Select the deployment called main to see which resources were deployed, then select Deployment details to expand it. In this case, there's one storage account with the name that you specified.

Leave the page open in your browser. You'll check on deployments again later.
You can also verify the deployment from the command line. To do so, run the following Azure CLI command:
az deployment group list --output table
You can also verify the deployment from the command line. To do so, run the following Azure PowerShell command:
Get-AzResourceGroupDeployment -ResourceGroupName <your resource group name> | Format-Table
Add an App Service plan and app to your Bicep file
In the previous task, you learned how to create a Bicep file that contains a single resource and deploy it. Now you're ready to deploy more resources, including a dependency. In this task, you'll add an App Service plan and app to the Bicep file.
In the main.bicep file in Visual Studio Code, add the following code to the bottom of the file:
resource appServicePlan 'Microsoft.Web/serverfarms@2024-04-01' = {
  name: 'toy-product-launch-plan-starter'
  location: 'eastus'
  sku: {
    name: 'F1'
  }
}

resource appServiceApp 'Microsoft.Web/sites@2024-04-01' = {
  name: 'toy-product-launch-1'
  location: 'eastus'
  properties: {
    serverFarmId: appServicePlan.id
    httpsOnly: true
  }
}
Update the name of the App Service app from
toy-product-launch-1to something that's likely to be unique. Make sure the name is 2 to 60 characters with uppercase and lowercase letters, numbers, and hyphens, and doesn't start or end with a hyphen.Save the changes to the file.
Deploy the updated Bicep file
Run the following Azure CLI command in the terminal. You can ignore the warnings about the hard-coded location. You'll fix the location soon.
az deployment group create --name main --template-file main.bicep
Run the following Azure PowerShell command in the terminal. You can ignore the warning messages about the hard-coded location. You'll fix the location soon.
New-AzResourceGroupDeployment -Name main -TemplateFile main.bicep
Check your deployment
Return to the Azure portal and go to your resource group. You'll still see one successful deployment, because the deployment used the same name as the first deployment.
Select the 1 Succeeded link.
Select the deployment called main, and then select Deployment details to expand the list of deployed resources.

Notice that the App Service plan and app were deployed.