Note
Access to this page requires authorization. You can try signing in or changing directories.
Access to this page requires authorization. You can try changing directories.
This tutorial walks you through an end-to-end workflow for publishing business events using a user data function and setting up an Activator rule to react to those events with email notifications. The steps you follow are:
- Create a business event and define its schema in Real-Time hub.
- Create a user data function in your workspace that publishes a business event.
- Validate the published events in Real-Time hub.
- Create an Activator rule that listens for the business event and triggers an email notification when the event occurs.
Important
This feature is in preview.
Create a new business event
Go to Business events in Real-Time hub.
Select + New business event and then select Create new schema.

Define the business event schema.
For Name, enter
OrderPlaced.In the right pane, for Event schema set, select Create.

Enter
Ordersfor the schema set name.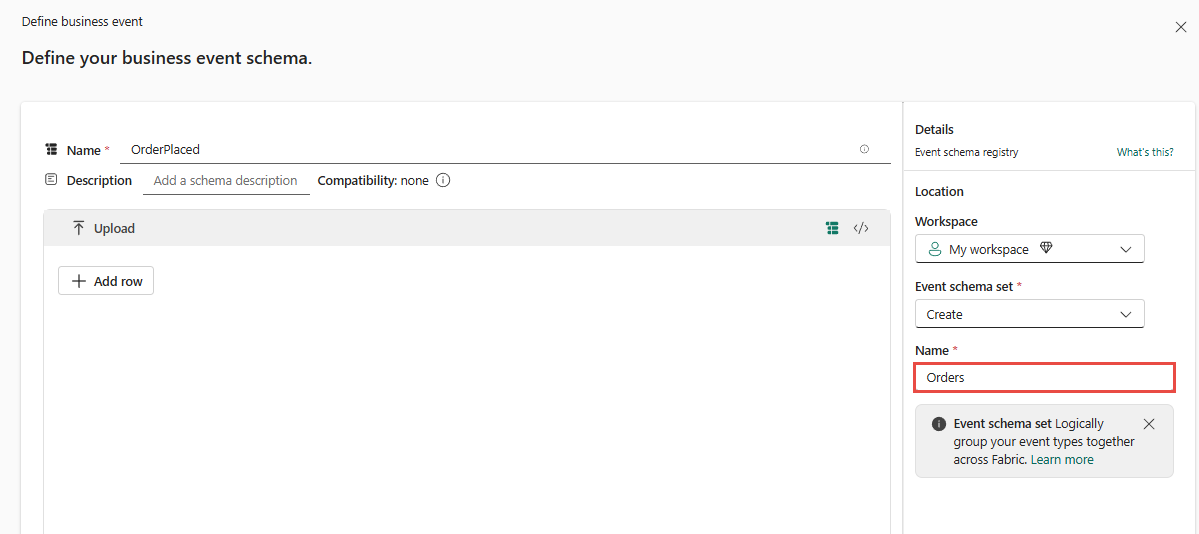
Select Add row in the middle plane.

Select string for event type, and enter
OrderIDfor the name.
Repeat the previous step to add the following properties:
CustomerID(string),Quantity(string),OrderTotal(string),Status(string),DiscountApplied(string)
Select Next to continue.
Review and confirm the configuration, and then select Create to create your business event.

Confirm that you see the business event in the list of business events in Real-Time hub.


Configure user data function to publish business events
After creating the business event, open another tab in your web browser, and go to your workspace.
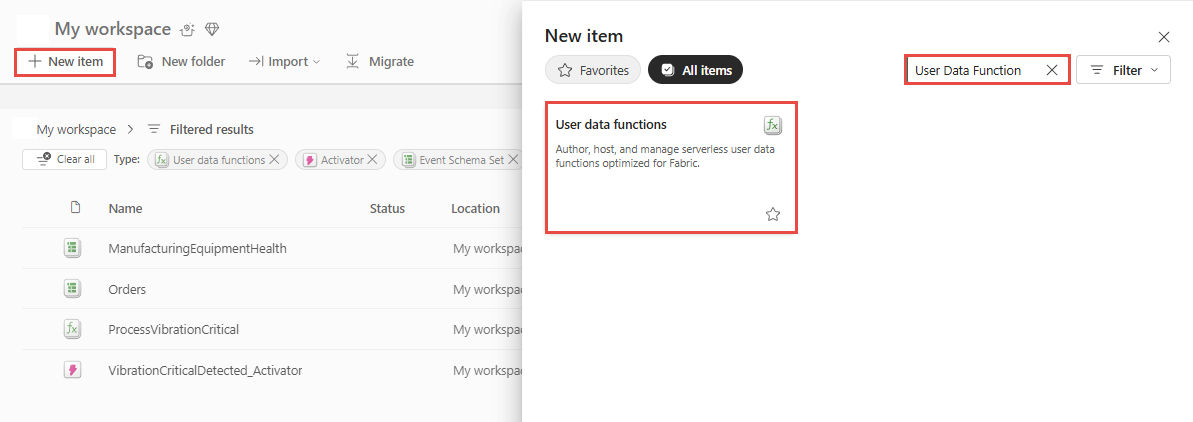
Select + New item and then search for User data functions and select it.
Enter
PublishOrderPlacedEventas the name for the user data function, and then select Create.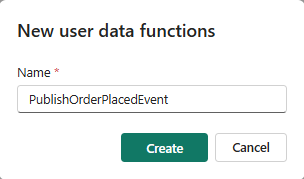
Select New function to create a new function in the user data function item.

In the Home ribbon, select Manage connections.

In the Connections pane, select + Add connection.

Search for Orders, select the schema set you created earlier, and then select Connect.

In the Manage connection pane, follow these steps:
Confirm that the connection is listed under the Connected to this item section.
Note down the alias for the connection, which is Orders by default.
Select X in the top-right corner to close the pane.

Replace the existing code in the function with the following code.
import fabric.functions as fn
import logging

udf = fn.UserDataFunctions()
@udf.connection(argName="businessEventsClient", alias="Orders")

@udf.function()
def PublishOrders(businessEventsClient: fn.FabricBusinessEventsClient) -> str:
    logging.info("PublishOrders invoked.")

    # Prepare the event data payload

    event_data = {
        "OrderID": "12345",
        "CustomerID": "C-10",
        "Quantity": "12",
        "OrderTotal": "23.21",
        "Status": "shipped",
        "DiscountApplied": "5%"
    }

    # Generate the business event

    businessEventsClient.PublishEvent(
        type="OrderPlaced",
        event_data=event_data,
        data_version="v1"
    )

    return "Event 'OrderPlaced' published successfully."
In the Functions explorer pane, hover over the function you modified, select the ⋯ (three dots) menu, and then select Test.

In the Test window, select Test to run the function, and confirm that it works as expected. You should see the output message Event 'OrderPlaced' published successfully. in the output pane.


Verify published business events
Switch to the tab with Real-Time hub page or select Real-Time on the left navigation pane.
Go to Business events in Real-Time hub.
Select the
OrderPlacedbusiness event.
In the Publisher tab, confirm that you see an event and the function is listed in the publisher list.

Select the Data preview tab.
In the publisher filter, select the name of the function (PublishOrderPlacedEvent), which is a publisher.
Visualize the event in the preview table.


Create an Activator trigger to consume events and send email notifications
Select the Real-Time hub icon in the left navigation pane of the Fabric portal.
In the Real-Time hub, select Business events under the Subscribe to category.
In the Business events list, locate
OrderPlacedevent. Select either the ⚡ lightning icon or the ⋯ (three dots) menu next to the event, and then select Set alert.
On the Add rule page, in the Details section, for Rule name, enter a name for the rule. For example, OrderPlaced_Rule.
In the Condition section, for Check, select On each event.
In the Action section, select one of the following actions. To configure the alert to trigger a function when the condition is met, follow these steps:
For Select action, select Email.
For To, enter the email address where you want to receive the notification when the event occurs.
For Subject, enter the subject of the email notification (for example, Order Placed Event Detected).
For Body, enter the content of the email notification. While entering the content, enter
@to access event properties to include in the email. You can also use dynamic content by selecting the icon next to each text box.
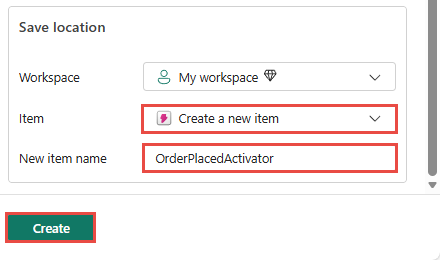
In the Save location section, for Workspace, select the workspace where you want to create the Fabric activator item.
For Item, select the drop-down list, and then select Create a new item.
For New item name, enter a name for the new Fabric activator item (for example, OrderPlacedActivator), and then select Create.
You see the Alert created page with a link to open the rule in the Fabric activator user interface in a separate tab.

Select Open to open the rule in the Fabric Activator user interface.


Test the solution
Publish another event
Switch to the tab with the user data function.
Test the function again to publish another
OrderPlacedevent by selecting the Test button in the Test window.
View business event in the Real-Time hub
Publishers tab
In the Real-Time hub, select Business events in the left menu.
Select OrderPlaced from the list of business events.
In the Publisher tab, confirm that you see the newly published event and the old event you published at the beginning of the tutorial. If you don't see the new event, select the refresh button to refresh the list of events. It might take a few seconds for the new event to appear in the list.
In the list of publishers, confirm that the function you used to publish the event is listed as a publisher.


Consumers tab
Switch to the Consumers tab.
Confirm that you see an event was delivered within the last hour.
Confirm that the activator you created is listed as a consumer.


Data preview tab
Switch to the Data preview tab.
Confirm that you see the consumer filter with the activator you created.


View business event in the activator run history
Go to the workspace where you created the activator item, and open the activator item (for example, OrderPlacedActivator) if it's not already open.
In the activator item, select the History tab.
Confirm that you see one activation. In the Activation details pane at the bottom, you see the activation details that include context information you wanted to include in the email notification.


Check your email for the notification
You should receive an email notification with the subject and content you configured in the email action of the activator rule. The email should also include the context information from the business event that you included in the email body.
