Note
Access to this page requires authorization. You can try signing in or changing directories.
Access to this page requires authorization. You can try changing directories.
Global Secure Access supports network content filtering through content policies. This feature helps you safeguard against unintended data exposure and prevents inline data leaks to generative AI applications and internet destinations. By extending data protection capabilities to the network layer through Global Secure Access, network content filtering enables your organization to enforce data policies on network traffic in real time. You can discover and protect files shared with unsanctioned destinations, such as generative AI and unmanaged cloud apps, from managed endpoints through browsers, applications, add-ins, APIs, and more.
The network content filtering solution brings together Microsoft Purview's data classification service and the identity-centric network security policies in Global Secure Access. This combination creates an advanced network-layer data security solution, Data Loss Prevention (DLP), that's identity-centric and policy-driven. By combining content inspection with real-time user risk evaluation, you can enforce granular controls over sensitive data movement across the network without compromising user productivity or security posture.
Note
Basic content policy (block or allow by file MIME type) is generally available. The Scan with Purview action in content policies is currently in preview. This information relates to a prerelease product that might be substantially modified before release. Microsoft makes no warranties, expressed or implied, with respect to the information provided here.
High-level architecture

This article explains how to create a content policy to filter internet traffic flowing through Global Secure Access.
Note
Basic content policy detects the file MIME type and enforces the Allow or Block action in Global Secure Access. Microsoft Purview is only involved when you choose Scan with Purview.
Supported scenarios
Network content filtering supports the following key scenarios and outcomes for HTTP/1.1 traffic:
- Using Basic content policy, you can block files based on supported file MIME types.
- Using the Scan with Purview action (preview) in content policy, you can audit and block files based on:
- Microsoft Purview sensitivity labels
- Sensitive content in the file
- The user's risk level
- When you use Scan with Purview, you can generate Data Loss Prevention (DLP) admin alerts for rule matches.
Important
Network content filtering supports only files over HTTP/1.1. It doesn't support network content filtering for text.
Prerequisites
To use the content policy feature, you need the following prerequisites:
A valid Microsoft Entra tenant.
Licensing for the product. For details, see the licensing section of What is Global Secure Access. If needed, you can purchase licenses or get trial licenses.
- A valid Microsoft Entra Internet Access license.
- A valid Microsoft Purview license, required for Scan with Purview inspection.
- You must set up pay-as-you-go billing to use Scan with Purview.
- You can use basic content policy without a Purview license.
A user with the Global Secure Access Administrator role in Microsoft Entra ID to configure Global Secure Access settings.
A Conditional Access Administrator role to configure Conditional Access policies.
The Global Secure Access client requires a device (or virtual machine) that is either Microsoft Entra ID joined or Microsoft Entra ID Hybrid joined.
User Datagram Protocol (UDP) traffic (that is, QUIC) isn't supported. Most websites support fallback to Transmission Control Protocol (TCP) when QUIC can't be established. For an improved user experience, you can deploy a Windows Firewall rule that blocks outbound UDP 443:
@New-NetFirewallRule -DisplayName "Block QUIC" -Direction Outbound -Action Block -Protocol UDP -RemotePort 443
Initial configuration
To configure content policies, complete the following initial setup steps:
- Enable the Internet Access traffic forwarding profile and ensure correct user assignments.
- Configure the Transport Layer Security (TLS) inspection policy.
- Install and configure the Global Secure Access client:
- Install the Global Secure Access client on Windows or macOS.
Important
Before you continue, test and ensure your client's internet traffic is routed through Global Secure Access. To verify the client configuration, see the steps in the following section.
- Select the Global Secure Access icon and select the Troubleshooting tab.
- Under Advanced Diagnostics, select Run tool.
- In the Global Secure Access Advanced Diagnostics window, select the Forwarding Profile tab.
- Verify that Internet Access rules are present in the Rules section. This configuration might take up to 15 minutes to apply to clients after enabling the Internet Access traffic profile in the Microsoft Entra admin center.

- Install the Global Secure Access client on Windows or macOS.
- Confirm access to web applications you plan for content policies.

Configure a content policy
To configure a content policy in Global Secure Access, complete the following steps:
- Create a content policy.
- Link the content policy to a security profile.
- Configure a Conditional Access policy.
Create a content policy
- Sign in to the Microsoft Entra admin center as a Global Secure Access Administrator.
- Browse to Global Secure Access > Secure > Content policies.

- Select + Create Policy. Pick the options that fit your needs.
- On the Basics tab:
- Enter the policy Name.
- Enter the policy Description.
- Select Next.

- On the Rules tab:
- Add a new rule.
- Enter the Rule name, Description, Priority, and Status as appropriate.
- Select the appropriate option for the Action menu:
- To configure a basic data policy, select Allow or Block.
- To use data policies configured in Microsoft Purview, select Scan with Purview (preview).

- For Matching conditions, select the appropriate Activities and Content types.
- Select + Add destination and configure the destinations.
- For application-specific control, you can add the exact upload URLs and related FQDNs that the app uses. Use browser developer tools or network traffic analysis to identify the endpoints used during file upload.
- You can also select web categories as a destination. If you select web categories, you must also configure a web content filtering policy.
- Select Next.
- On the Review tab, review your settings.

- Select Create to create the policy.


Important
If you choose the Scan with Purview action in a content policy rule, you must also configure a corresponding DLP policy in Microsoft Purview that targets inline web traffic. Without a matching Purview DLP policy, the content policy can't inspect file content or enforce allow or deny decisions. See Configure a Purview DLP policy for network data security for step-by-step guidance and Example: Block sensitive PDF uploads to ChatGPT for a concrete scenario.
Link the content policy to a security profile
- Browse to Global Secure Access > Secure > Security profiles.
- Select the security profile you want to modify.
- Switch to the Link policies view.
- Configure the link content policy:
- Select + Link a policy > Existing Content policy.
- From the Policy name menu, select the content policy you created.
- Keep the default values for Position and State.
- Select Add.
- Close the security profile.
Configure a Conditional Access policy
To enforce the Global Secure Access security profile, create a Conditional Access policy with the following configuration:
- Sign in to the Microsoft Entra admin center.
- Browse to Identity > Protection > Conditional Access.
- Select + Create new policy.
- Name the policy.
- Select the users and groups to apply the policy to.
- Set the Target resources to All internet resources with Global Secure Access.
- Configure the Network, Conditions, and Grant sections according to your needs.
- Under Session, select Use Global Secure Access Security Profile and select the security profile you created.
- To create the policy, select Create.
For more information, see Create and link a Conditional Access policy.
The content policy is successfully configured.
Configure a Purview DLP policy for network data security
If you selected the Scan with Purview action in your content policy, you must configure a corresponding data loss prevention (DLP) policy in Microsoft Purview. The DLP policy defines how Purview classifies and acts on files that Global Secure Access routes for inspection.
Important
The Scan with Purview integration for Global Secure Access is currently in PREVIEW. This information relates to a prerelease product that might be substantially modified before release. Microsoft makes no warranties, expressed or implied, with respect to the information provided here.
Prerequisites for Purview integration
- Microsoft Purview pay-as-you-go billing configured for your tenant. For network data security DLP scenarios, the pay-as-you-go subscription is all you need. If you use other DLP functionality, per-seat licensing is required. For more information, see Learn about Microsoft Purview billing models.
- The Global Secure Access integration enabled in the Microsoft Purview portal.
Enable the Global Secure Access integration in Purview
- Sign in to the Microsoft Purview portal.
- Select Settings (gear icon in the upper-right corner) > Data loss prevention > Integrations.
- Locate the Microsoft Entra Internet Access integration and select Get started.
- Complete the integration steps to connect Global Secure Access with Purview.
Note
If you don't see Data loss prevention under Settings, your account might not have the required permissions or your tenant might not have the required licensing. You need a role such as DLP Compliance Management or Information Protection Admin, and a Microsoft 365 E5/A5 subscription or a Microsoft Purview DLP add-on. For more information, see Permissions in the Microsoft Purview portal.
For detailed steps on SASE provider integration, see Use Network Data Security to help prevent sharing sensitive information with unmanaged AI -- SASE provider integration.
Create a DLP policy for network data security
- Sign in to the Microsoft Purview portal.
- Select Data loss prevention > Policies > + Create policy.
- Select Inline web traffic.
- Select Custom from the Categories list and then select Custom policy from the Regulations list.
- Select Next.
- Enter a policy name and description, then select Next.
- Configure the cloud apps to monitor:
- Select + Add cloud apps.
- On the Adaptive app scopes tab, choose the app categories you want to protect against (for example, All unmanaged AI apps).
- Select Add.
- Select Next.
- On the Choose where to enforce the policy page, ensure Network is enabled, then select Next. You can only select Network when pay-as-you-go billing is set up. For more information, see Learn about Microsoft Purview billing models.
- Select Create or customize advanced DLP rules and select Next.
- Select + Create rule and configure the rule:
- Enter a Name and optional description.
- Under Conditions, select + Add condition > Content contains.
- Add the sensitive information types or sensitivity labels that match your organization's data protection requirements.
- Under Actions, select + Add an action > Restrict browser and network activities.
- Select File uploaded to or shared with cloud or AI apps and set the action to Audit or Block as appropriate.
- Configure Incident reports and alert settings as needed.
- Select Save.
- Review the rule, ensure its status is On, and select Next.
- On the Policy mode page, choose Turn the policy on immediately or run in simulation mode first to test.
- Select Next, review the policy, and select Submit.
Note
Global Secure Access supports file activities only. Text-based activities in the DLP policy apply to other integrated SASE solutions but not to Global Secure Access.
For a detailed walkthrough with example configurations, see Use Network Data Security to help prevent sharing sensitive information with unmanaged AI.
Test the content policy
Test the configuration by attempting to upload or download files that match the content policy conditions. Verify that the policy settings block or allow the actions.
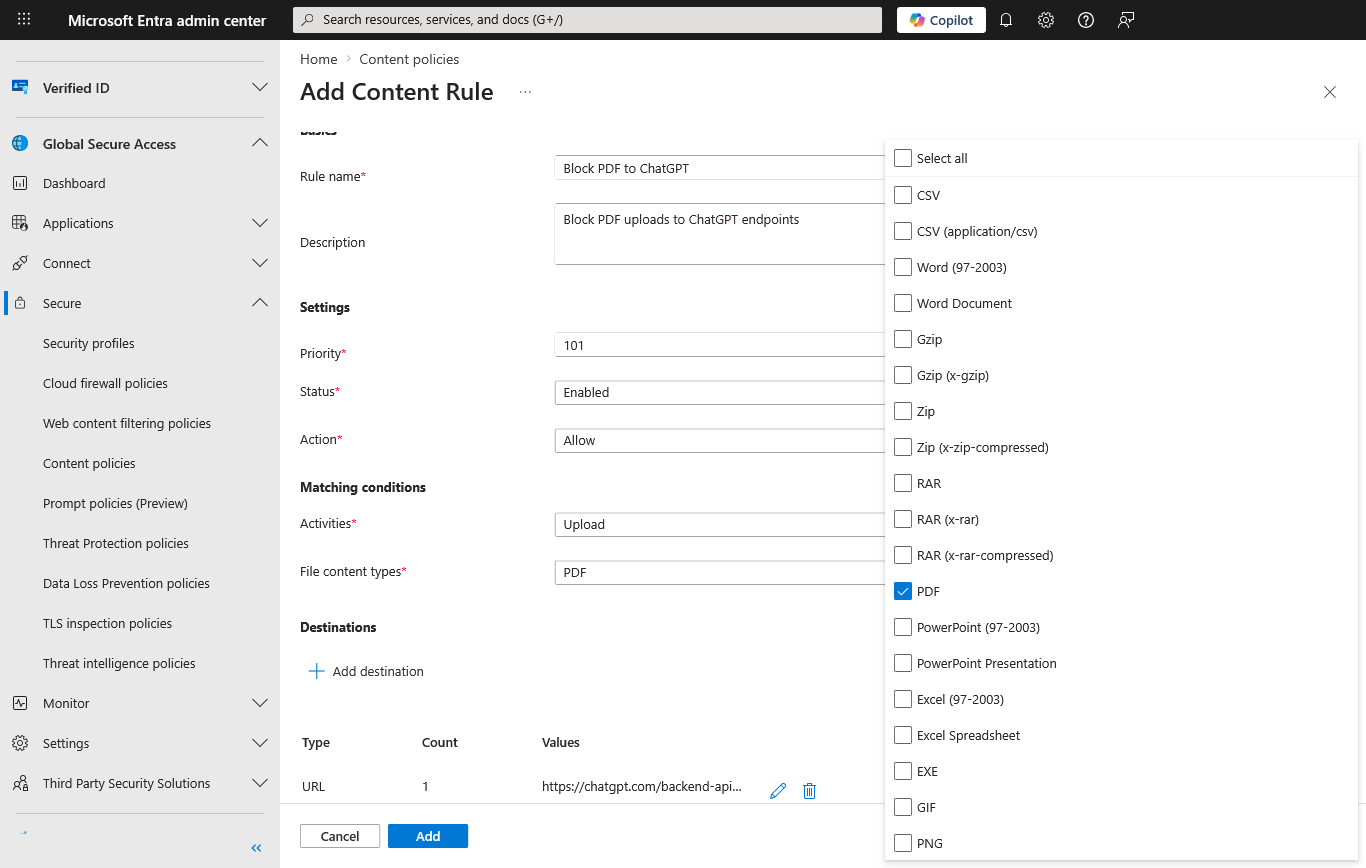
Example: Block sensitive PDF uploads to ChatGPT
This example walks through an end-to-end test scenario that blocks a PDF file containing sensitive data (such as credit card numbers or Social Security numbers) from being uploaded to ChatGPT.
Step 1: Configure the content policy destinations
When you create or edit your content policy rule, don't add only chatgpt.com. Add the specific URLs and FQDNs that match ChatGPT file upload traffic:
https://chatgpt.com/backend-api/files(add as URL)https://chatgpt.com/backend-api/files/process_upload_stream(add as URL)*.oaiusercontent.com(add as FQDN)
For Content types, select PDF (and other file types you want to inspect).
Tip
Web applications often use multiple URLs and FQDNs under the hood. Use browser developer tools or network traffic analysis to identify the correct upload endpoints for your target destination. For ChatGPT, the URLs listed here are the endpoints used for file upload operations.
Step 2: Configure a Purview DLP policy (for Scan with Purview action)
If you select Scan with Purview as the content policy action, you must also configure a corresponding Microsoft Purview DLP policy to inspect the file content and make the allow or deny decision.
- In the Microsoft Purview portal.
- Follow the steps in Use Network Data Security to help prevent sharing sensitive information with unmanaged AI to create a new DLP policy.
- In the Cloud apps step, search for and add ChatGPT.
- Configure the DLP rule to detect the sensitive information types you want to block (for example, credit card numbers or Social Security numbers).
- Set the rule action to Block.
- Save and apply the policy.
For more information about Purview DLP policies for network traffic, see Learn about Microsoft Purview Network Data Security.
Note
Network DLP with Global Secure Access integration is currently in preview. Global Secure Access forwards matching upload traffic to Microsoft Purview for content inspection. Purview evaluates the content against your DLP policy and returns an allow or deny decision. Global Secure Access then enforces the result.
Step 3: Validate the policy
- On a managed device with the Global Secure Access client installed, open a browser and go to ChatGPT.
- Prepare a test PDF file that contains sensitive data, such as sample credit card numbers or Social Security numbers. You can use a sample file from dlptest.com.
- In ChatGPT, attempt to upload the test PDF file.
- Verify that the upload is blocked. ChatGPT displays an error message because Global Secure Access prevented the file transfer.
- To confirm the block, check the traffic logs in the Microsoft Entra admin center under Global Secure Access > Monitor > Traffic logs.
- If you use Scan with Purview, also review the matching alert or activity details in Microsoft Purview. For more information, see Get started with the data loss prevention Alerts dashboard and Get started with activity explorer.
Known limitations
- Network content filtering doesn't support text. It only supports files.
- Compressed content is detected in ZIP format. The content isn't decompressed.
- True file type detection might not be 100% accurate.
- Destination applications that use WebSocket, such as Copilot, aren't supported.
- Top level and second level domains don't support wildcards (like
*,*.com,*contoso.com) while configuring FQDNs.
Monitoring and logging
Review Global Secure Access traffic logs
To view traffic logs:
- Sign in to the Microsoft Entra admin center as at least a Reports Reader.
- Select Global Secure Access > Monitor > Traffic logs.
Review Microsoft Purview investigation data
If you use Scan with Purview, review the corresponding investigation data in Microsoft Purview:
- Sign in to the Microsoft Purview portal.
- To review DLP alerts and their associated events, go to Data loss prevention > Alerts. For more information, see Get started with the data loss prevention Alerts dashboard.
- To investigate matching activities, open Activity explorer and filter for Network DLP activities or the policy, user, or app you want to review. For more information, see Get started with activity explorer.
Note
Purview alerts and Activity explorer apply only when you use Scan with Purview. If you use basic content policy with Allow or Block actions, review the Global Secure Access traffic logs instead.
Related content
- Learn about Microsoft Purview Network Data Security
- Use Network Data Security to help prevent sharing sensitive information with unmanaged AI
- Get started with the data loss prevention Alerts dashboard
- Get started with activity explorer
- How to configure Global Secure Access web content filtering
- Enable the Internet Access traffic forwarding profile
- Configure Transport Layer Security inspection