Note
Access to this page requires authorization. You can try signing in or changing directories.
Access to this page requires authorization. You can try changing directories.
Azure DevOps Services | Azure DevOps Server | Azure DevOps Server 2022
Azure Artifacts upstream sources simplify package management by enabling developers to store packages from multiple sources in a single feed. When a package is installed for the first time from an upstream source, Azure Artifacts automatically saves a copy to your feed to ensure continued access, even if the upstream source becomes temporarily unavailable. This tutorial walks you through how to set up an internal feed from the same organization as an upstream source in Azure Artifacts.
Prerequisites
| Product | Requirements |
|---|---|
| Azure DevOps | - An Azure DevOps organization. - An Azure DevOps project. |
Create a feed
If you don’t already have a feed, follow these steps to create one and add common public registries as upstream sources:
Sign in to Azure DevOps and go to your project.
Select Artifacts, then select Create feed.
Enter a Name for the feed and choose the appropriate Visibility and Scope settings.
Select Include packages from common public sources to add common public registries as upstream sources.
Select Create when you're done.
Connect to your feed
Use the following steps to configure your project and authenticate with your feed. This example uses a Rust project. For other technologies, see the project setup links in the following section.
Sign in to Azure DevOps, and go to your project.
Select Artifacts, choose your feed from the dropdown menu, and then select Connect to feed.
From the left navigation pane, select Cargo.
In the Project setup section, copy the first snippet and add it to the cargo/config.toml file in your source repository. Your config.toml file should resemble the following:
[registries]
FEED_NAME = { index = "sparse+https://pkgs.dev.azure.com/ORGANIZATION_NAME/PROJECT_NAME/_packaging/FEED_NAME/Cargo/index/" }
Project setup for other package types
If you’re using a different technology, use the links below to follow the appropriate project setup guidance to connect to your feed:
Set up the upstream feed
Follow these steps to set up an internal feed from the same organization as an upstream source:
Sign in to Azure DevOps, then navigate to your project.
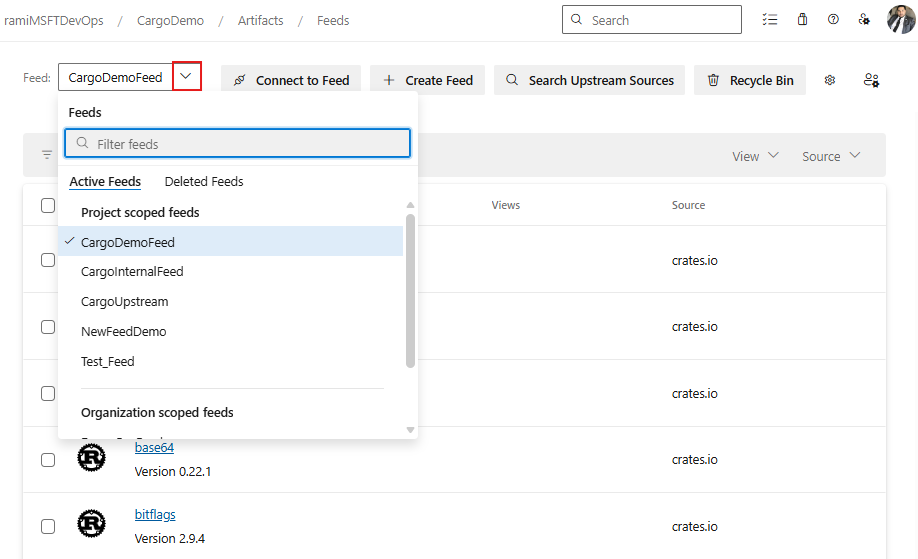
Select Artifacts, then select the feed you created earlier from the feed dropdown menu.
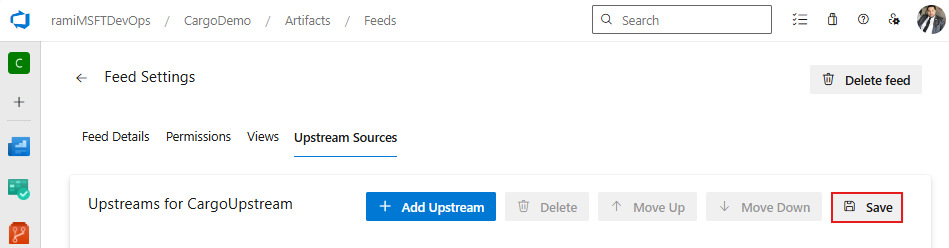
Select the gear icon button
 to navigate to Feed settings.
Select Upstream sources, then select Add Upstream.
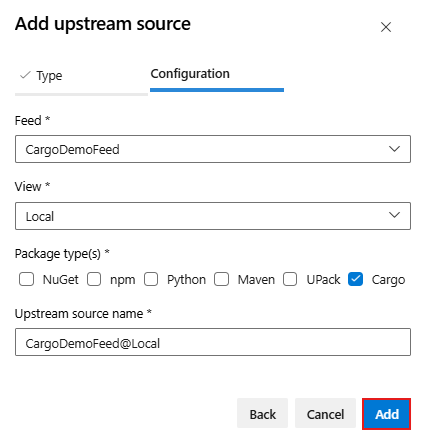
On the Type tab, select Azure Artifacts feed in this organization.
On the Configuration tab, from the Feed dropdown menu, select the feed you want to add as an upstream source. Select the desired View, then choose the Package type(s) to include, and optionally update the Upstream source name.
Select Add when you're done.
Select Save to apply your changes.
Install packages from upstream
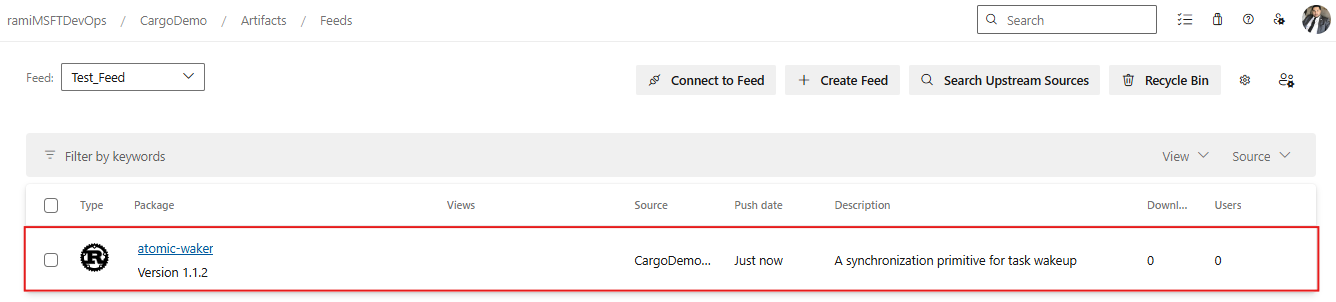
The following example illustrates a scenario where Test_Feed has CargoDemoFeed configured as an upstream source. For demonstration purposes Test_Feed is empty and contains no packages.
When a collaborator (or higher) installs a package from Test_Feed that is available in the upstream CargoDemoFeed, Azure Artifacts copies that package into the downstream Test_Feed and downloads it as part of the normal cargo install flow. After this first-time copy, all future downloads of that package from Test_Feed require only Feed Reader (or higher) permissions, because those later downloads don't modify the downstream feed. Only the first install copies the package from upstream to downstream, so only that initial action requires elevated permissions.
Sign in to Azure DevOps, then navigate to the project that hosts the upstream feed (in this example, CargoDemoFeed).
Select Artifacts, then from the dropdown menu, select the upstream feed (CargoDemoFeed).
Find the package you want to install and note its name. In this example, atomic-waker is the package name. You can also search upstream packages directly from your downstream feed in the Azure Artifacts UI. See Search packages from upstream sources for more details.
Navigate to the root of your project and open your Cargo.toml. Add the package under [dependencies]. Because this is a private crate dependency, you must specify the registry name in your Cargo.toml file. Cargo assumes crates.io as the default registry unless otherwise specified. Add the dependency as follows:
CRATE_NAME = { version = "VERSION_NUMBER", registry = "FEED_NAME" }

# Example:
# [dependencies]
# atomic-waker = { version = "1.1.2", registry = "Test_Feed" }
Open a local command prompt, navigate to the root of your project, and run the following command to build your project and download the crate:
cargo buildOnce the build completes, return to Azure DevOps > Artifacts and select your consuming feed (in this example, Test_Feed).
Verify that the package you installed locally now appears in your downstream feed. Azure Artifacts automatically saves a copy of the package when it’s installed from an upstream source.