Note
Access to this page requires authorization. You can try signing in or changing directories.
Access to this page requires authorization. You can try changing directories.
This article shows you how to connect a single Amazon Web Services (AWS) account or AWS management account to Microsoft Defender for Cloud by using the native AWS connector.
After you connect the account, Defender for Cloud discovers AWS resources, assesses security posture, and surfaces security recommendations and alerts.
The following screenshot shows AWS accounts displayed in the Defender for Cloud overview dashboard:
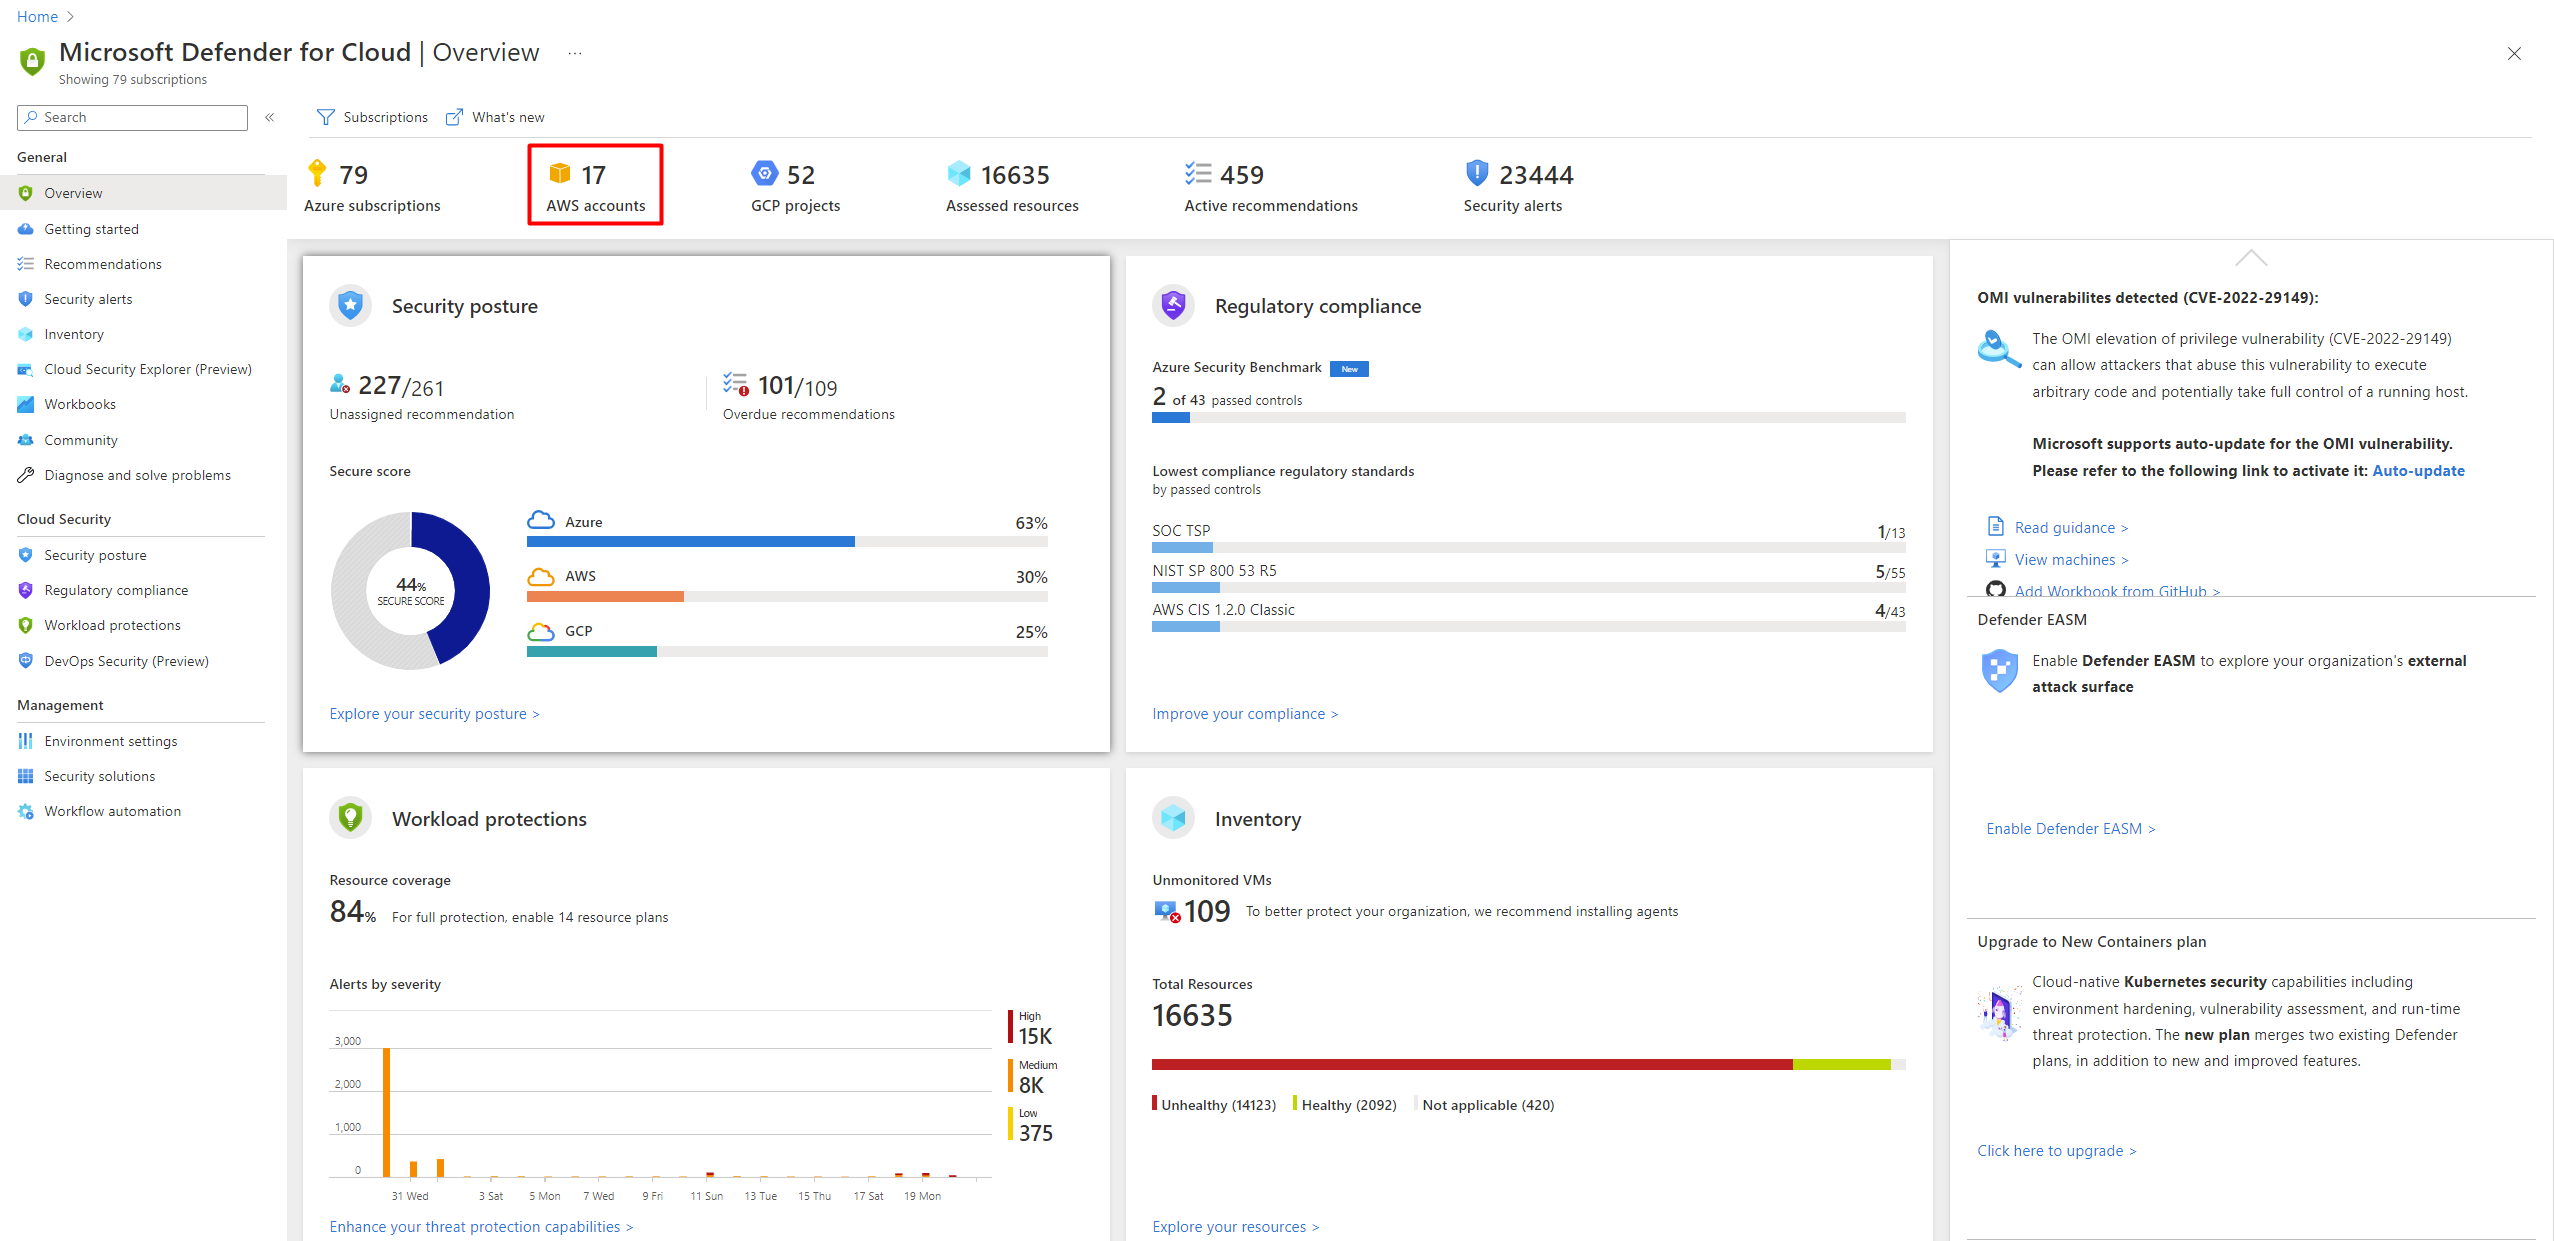
For more information, watch the New AWS connector in Defender for Cloud video from the Defender for Cloud in the Field video series.
Note
If you have an AWS account that is connected to Microsoft Sentinel, you can't connect it to Defender for Cloud. To ensure the connector works correctly, follow the instructions on Connect a Sentinel connected AWS account to Defender for Cloud.
Authentication architecture
When you connect an AWS account, Microsoft Defender for Cloud authenticates to AWS using federated trust and short-lived credentials, without storing long-lived secrets.
Learn more about how authentication is established between Microsoft Entra ID and AWS, including the IAM roles and trust relationships created during onboarding.
Prerequisites
Before you connect your AWS account, make sure you have:
A Microsoft Azure subscription. If you don't have one, sign up for a free subscription.
Microsoft Defender for Cloud enabled on your Azure subscription.
Access to an AWS account.
Contributor level permission for the relevant Azure subscription.
To enable CIEM as part of Defender CSPM, you need the required Security Admin role and Application.ReadWrite.All permission for the tenant.
Additional requirements apply when enabling specific Defender plans. Review the native connector plan requirements.
Note
The AWS connector isn't available on the national government clouds (Azure Government, Microsoft Azure operated by 21Vianet).
Native connector plan requirements
Each Defender plan has specific setup requirements.
- Defender for Containers
- Defender for SQL
- Defender for open-source databases (Preview)
- Defender for Servers
- Defender CSPM
- At least one Amazon EKS cluster with access to the Kubernetes API server. If you don't have one, create a new EKS cluster.
- Capacity to create an Amazon SQS queue, Kinesis Data Firehose delivery stream, and Amazon S3 bucket in the same region as the cluster.
Connect your AWS account
Important
For management account onboarding, use only the AWS management account. Delegated administrator accounts aren't supported.
To connect your AWS environment to Defender for Cloud by using a native connector:
Sign in to the Azure portal.
Go to Defender for Cloud > Environment settings.
Select Add environment > Amazon Web Services.

Enter a Name for your connector.
For Onboard, select the account type:
- Management account: Creates a connector for the AWS management account. Auto provisioning creates connectors for discovered member accounts and newly created accounts under the management account.
- Single account: Creates a connector for a single AWS account.
Select the AWS regions that contain resources you want Defender for Cloud to protect. All regions are selected by default.
Select the Subscription in which the security connector will be created.
Select the Resource group in which the security connector will be created.
Select the Location where the security connector will be created.
Select an interval to scan the AWS environment every 4, 6, 12, or 24 hours. Some data collectors run with fixed scan intervals and aren't affected by custom interval configurations.
Enter your AWS account ID.
Management account only: If needed, enter AWS account IDs to exclude, separated by commas.

Select Next: Select plans.
Choose the Defender plans you want to enable.
Note
Each plan might incur charges. Learn more about Defender for Cloud pricing.
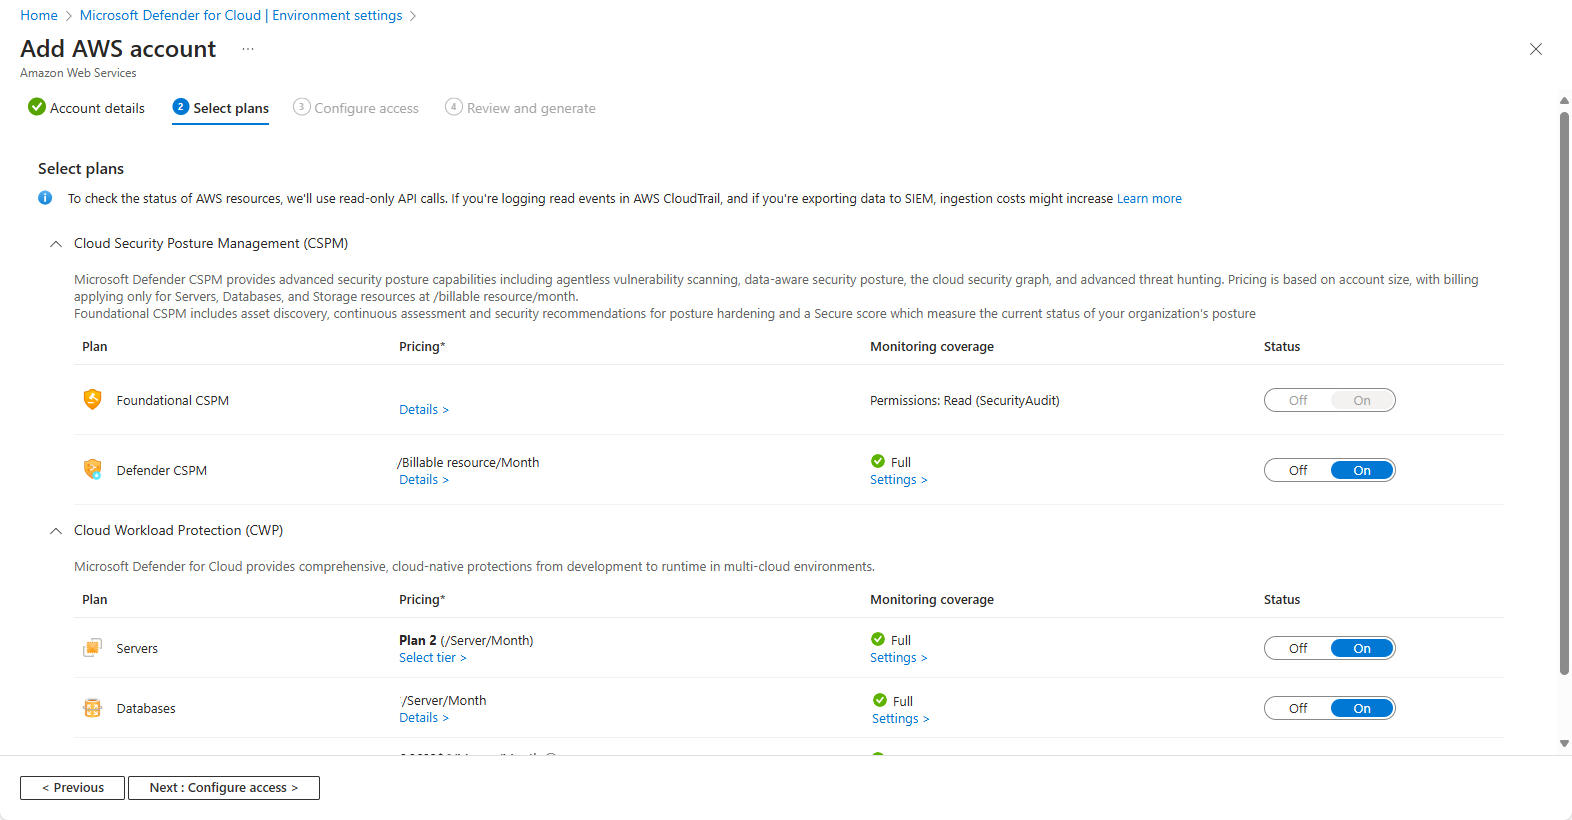
Important
To present the current status of your recommendations, the Microsoft Defender Cloud Security Posture Management plan queries the AWS resource APIs several times a day. These read-only API calls incur no charges, but they're registered in CloudTrail if you enable a trail for read events.
AWS documentation explains that there are no extra charges for keeping one trail. If you're exporting the data out of AWS, for example to an external SIEM system, this increased volume of calls might also increase ingestion costs. In such cases, we recommend filtering out the read-only calls from the Defender for Cloud user or ARN role:
arn:aws:iam::[accountId]:role/CspmMonitorAws. This is the default role name. Confirm the role name configured on your account.Select Configure access.
Select the permissions type:
- Default access: Grants permissions required for current and future capabilities.
- Least privilege access: Grants only the permissions required today. You might receive notifications if additional access is needed later.
Select a deployment method:
- AWS CloudFormation
- Terraform
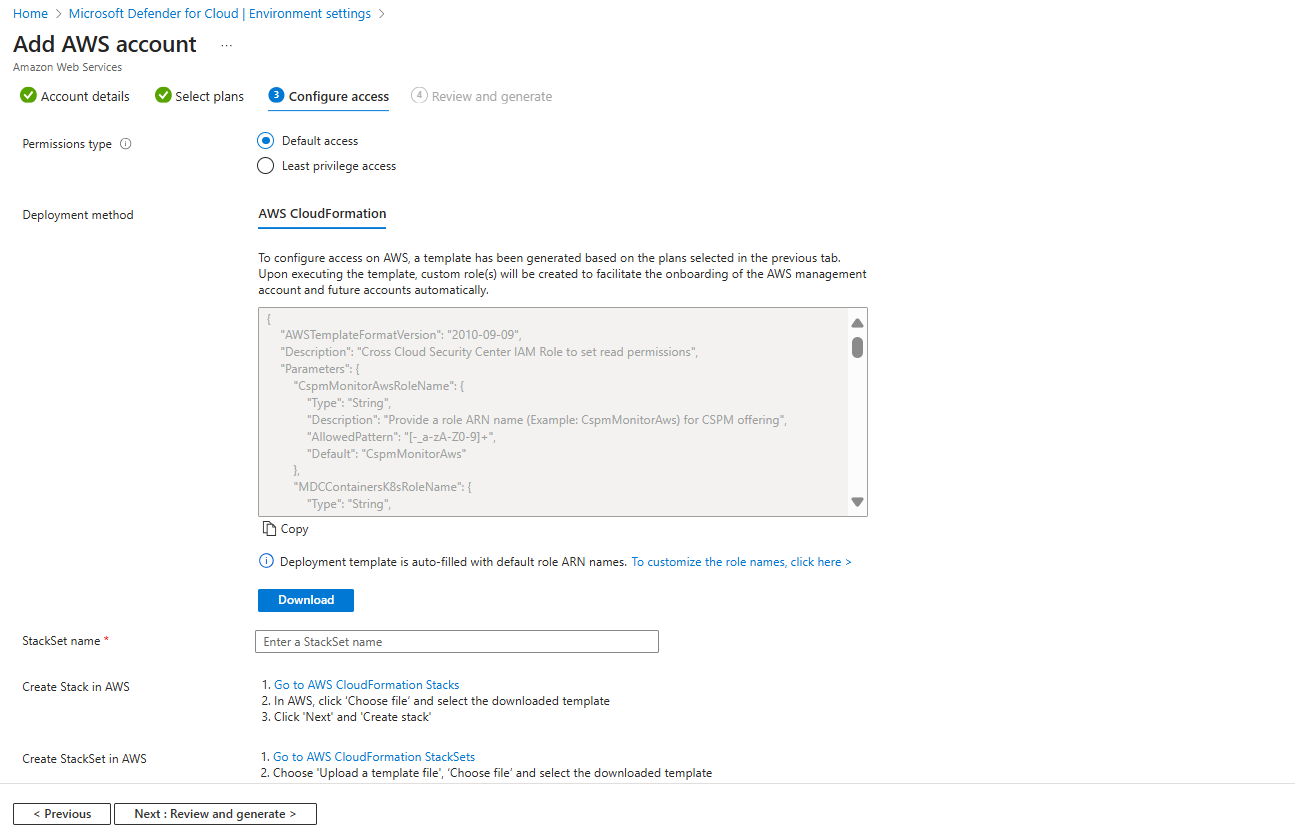
Follow the on-screen instructions for the selected deployment method to complete the required dependencies in AWS.
Note
If you select Management account, the tab for onboarding by using Terraform isn't visible in the UI. Terraform onboarding is still supported. For guidance, see Onboarding your AWS/GCP environment to Microsoft Defender for Cloud with Terraform.
If you deploy by using CloudFormation, choose one of the following template options:
Amazon S3 URL: Upload the downloaded CloudFormation template to your own S3 bucket with your own security configurations. Provide the S3 URL in the AWS deployment wizard.
Upload a template file: AWS automatically creates an S3 bucket to store the template. This configuration might trigger the
S3 buckets should require requests to use Secure Socket Layerrecommendation. You can fix it by applying the following bucket policy:{ "Id": "ExamplePolicy", "Version": "2012-10-17", "Statement": [ { "Sid": "AllowSSLRequestsOnly", "Action": "s3:*", "Effect": "Deny", "Resource": [ "<S3_Bucket_ARN>", "<S3_Bucket_ARN>/*" ], "Condition": { "Bool": { "aws:SecureTransport": "false" } }, "Principal": "*" } ] }
Important
When you run the CloudFormation StackSet for an AWS management account, you might encounter the following error message:
You must enable organizations access to operate a service managed stack setThis error means that trusted access for AWS Organizations isn't enabled.
To fix this error, go to the CloudFormation StackSets page and select the prompt to enable trusted access. After trusted access is enabled, run the CloudFormation template again.
Select Next: Review and generate.
Select Create.


Defender for Cloud starts scanning your AWS resources. Security recommendations appear within a few hours. After onboarding, you can monitor AWS posture, alerts, and resource inventory in Defender for Cloud.
Update the CloudFormation template
Update the CloudFormation template deployed in your AWS account when the permissions or resources required by Defender for Cloud change.
When to update the template
Update the template in the following cases:
- You enabled a new Defender plan, such as Defender CSPM, Defender for Databases, or Defender for Containers.
- You modified plan configuration, such as enabling auto provisioning or changing the selected regions.
- Microsoft released a new version of the template, such as a version that supports new features, fixes bugs, or updates the runtime.
- You experience deployment errors, such as
AccessDenied,EntityAlreadyExists, or Lambda runtime errors. For specific errors or CloudFormation template deployment errors, see the CloudFormation error resolution table.
Update the template
In Defender for Cloud, generate or download the latest CloudFormation template for the AWS connector.
In AWS CloudFormation, update the existing stack that was created for the Defender for Cloud connector.
Replace the existing template with the updated template file or with the Amazon S3 URL for the updated template.
Keep the existing stack details and parameters unless Defender for Cloud provides updated values.
Review the changes, acknowledge IAM resource changes if prompted, and update the stack.
Learn how to update stacks directly in AWS CloudFormation.
Validate connector health
To confirm that your AWS connector is operating correctly:
Sign in to the Azure portal.
Go to Defender for Cloud > Environment settings.
Locate the AWS account and review the Connectivity status column to see whether the connection is healthy or has issues.
Select the value shown in the Connectivity status column to view more details.
The Environment details page lists any detected configuration or permission issues affecting the connection to the AWS account.

If an issue is present, you can select it to view a description of the problem and the recommended remediation steps. In some cases, a remediation script is provided to help resolve the issue.
Learn more about troubleshooting multicloud connectors.
View your current coverage
Defender for Cloud provides access to workbooks through Azure workbooks. Workbooks are customizable reports that provide insights into your security posture.
The coverage workbook helps you understand your current coverage by showing which plans are enabled on your subscriptions and resources.
Enable AWS CloudTrail log ingestion (Preview)
AWS CloudTrail management event ingestion can enhance identity and configuration insights by adding context for CIEM assessments, activity-based risk indicators, and configuration change detection.
Learn more about integrating AWS CloudTrail logs with Microsoft Defender for Cloud (Preview).
Learn more
Check out the following blogs:
- Ignite 2021: Microsoft Defender for Cloud news
- Security posture management and server protection for AWS and GCP
Next steps
- Assign access to workload owners.
- Protect all of your resources with Defender for Cloud.
- Set up your on-premises machines and GCP projects.
- Get answers to common questions about onboarding your AWS account.
- Troubleshoot your multicloud connectors.