Note
Access to this page requires authorization. You can try signing in or changing directories.
Access to this page requires authorization. You can try changing directories.
Microsoft Defender for Cloud generates security alerts and recommendations. You can export this data to Log Analytics in Azure Monitor, to Azure Event Hubs, or to another Security Information and Event Management (SIEM), Security Orchestration Automated Response (SOAR), or IT classic deployment model solution. You can stream data as it's generated, or you can send scheduled snapshots of new data.
This article explains how to set up continuous export to a Log Analytics workspace or an event hub in Azure.
Tip
Defender for Cloud also offers a one-time, manual export to a comma-separated values (CSV) file. Learn how to download a CSV file.
Prerequisites
You need a Microsoft Azure subscription. If you don't have an Azure subscription, you can sign up for a free subscription.
You must enable Microsoft Defender for Cloud on your Azure subscription.
Required roles and permissions:
- Security Admin or Owner for the resource group
- Write permissions for the target resource.
- If you use the Azure Policy DeployIfNotExist policies, you must have permissions that let you assign policies.
- To export data to Event Hubs, you must have Write permissions on the Event Hubs policy.
- To export to a Log Analytics workspace:
If it has the SecurityCenterFree solution, you must have a minimum of Read permissions for the workspace solution:
Microsoft.OperationsManagement/solutions/read.If it doesn't have the SecurityCenterFree solution, you must have write permissions for the workspace solution:
Microsoft.OperationsManagement/solutions/action.Learn more about Azure Monitor and Log Analytics workspace solutions.
Set up continuous export in the Azure portal
You can set up continuous export in the Microsoft Defender for Cloud pages in the Azure portal, by using the REST API, or at scale by using Azure Policy templates.
To set up a continuous export to Log Analytics or Azure Event Hubs by using the Azure portal:
On the Defender for Cloud resource menu, select Environment settings.
Select the subscription that you want to configure data export for.
In the resource menu under Settings, select Continuous export.
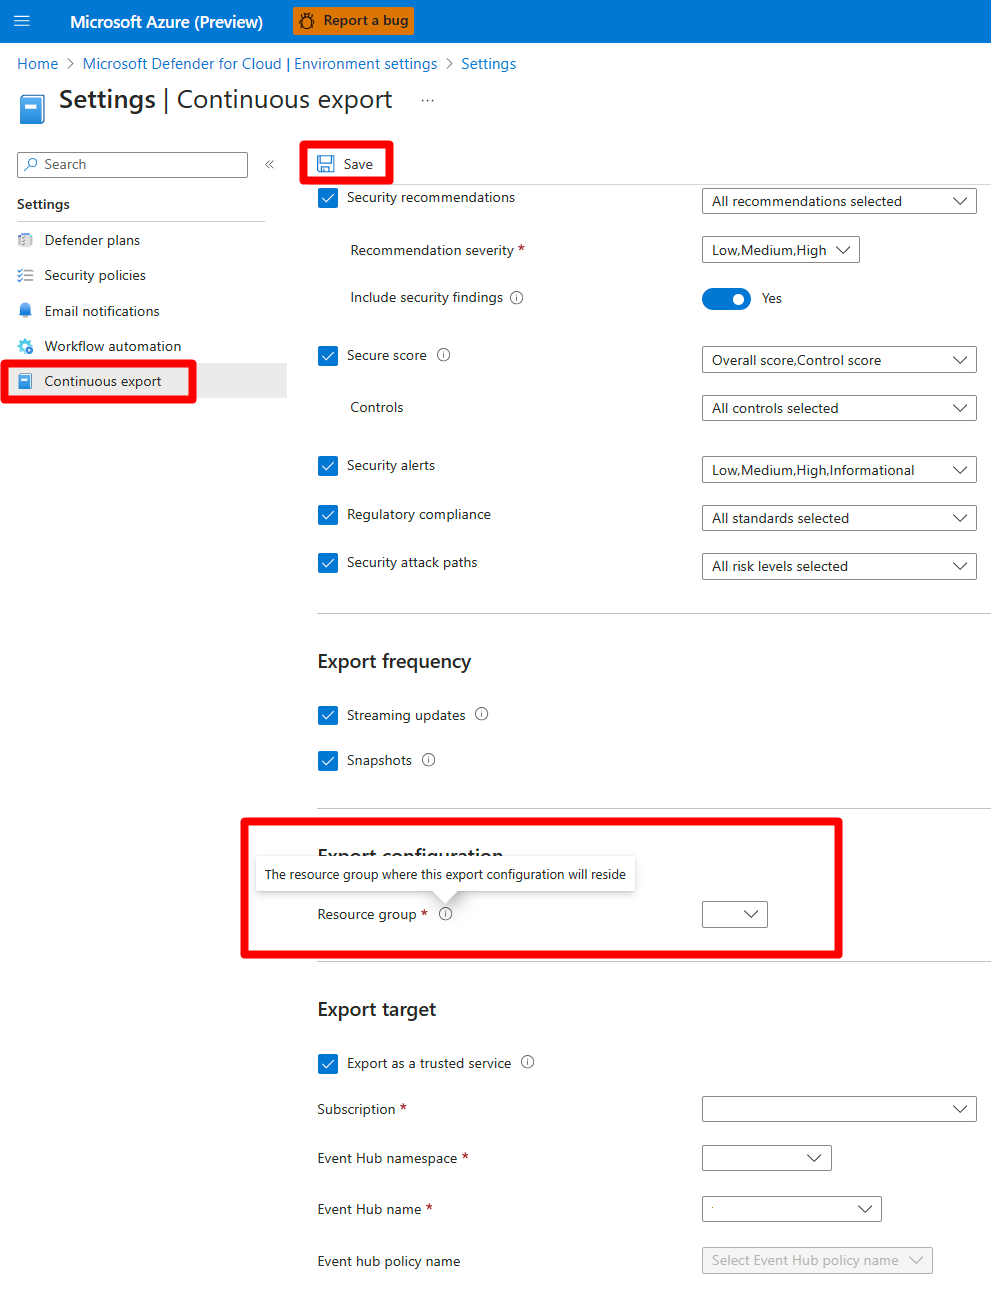
Export options appear. There's a tab for each target: Event Hubs or Log Analytics workspace.
Select the data type that you want to export, and then choose filters for that type. For example, you can export only high-severity alerts.
Select the export frequency:
- Streaming. Assessments are sent when a resource’s health state is updated (if no updates occur, no data is sent).
- Snapshots. A snapshot of the current state of the selected data types that are sent once a week per subscription. To identify snapshot data, look for the field IsSnapshot.
If your selection includes one of these recommendations, you can include the vulnerability assessment findings with them:
- SQL databases should have vulnerability findings resolved
- SQL servers on machines should have vulnerability findings resolved
- Container registry images should have vulnerability findings resolved (powered by Qualys)
- Machines should have vulnerability findings resolved
- System updates should be installed on your machines
To include the findings with these recommendations, set Include security findings to Yes.

Under Export target, choose where you'd like the data saved. Data can be saved in a target of a different subscription (for example, in a central Event Hubs instance or in a central Log Analytics workspace).
You can also send the data to an event hub or Log Analytics workspace in a different tenant
Select Save.
Note
Log Analytics supports only records that are up to 32 KB in size. When the data limit is reached, an alert displays the message Data limit has been exceeded.
Related content
In this article, you learned how to configure continuous exports of your recommendations and alerts. You also learned how to download your alerts data as a CSV file.
To see related content:
- Learn how to view exported data in Azure Monitor.
- Learn more about workflow automation templates.
- See the Azure Event Hubs documentation.
- Learn more about Microsoft Sentinel.
- Review the Azure Monitor documentation.
- Learn how to export data types schemas.
- Check out common questions about continuous export.